Configuring Cisco ASA Dynamic NAT
This lab will discuss and demonstrate the configuration and verification of Dynamic NAT on the Cisco ASA Platform, also known as Many to One NAT.
- Core Knowledge
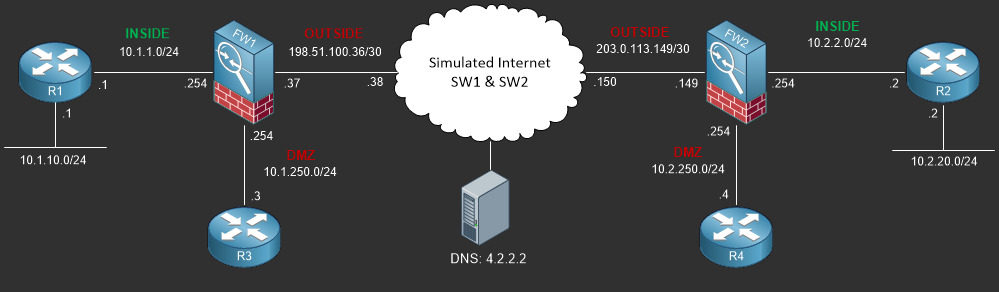
- Lab Topology
- Initial Configs
- Lab Objectives
- Lab Instruction
Core Knowledge and Real World Scenarios
When it comes to Network Address Translation, Dynamic NAT is by far the most common. Dynamic NAT, also known as Many to One NAT allows for internal private address pace such as the RFC1918 range to be translated to a single public facing IP Address.
This type of NAT is performed on all consumer grade products to allow multiple PC’s to access the internet using a single public IP Address.
Dynamic NAT works in a simple way which translates the internal private source IP Address and source port number to the public facing IP Address and random available source port number before forwarding the traffic to the destination.
So lets look at an Example;
Traffic from host 10.1.1.10:3948 going towards the Google Website 173.194.121.14:80 first hits the inside interface of the firewall, The firewall see’s the NAT policy and translates source IP 10.1.1.10 and port 3948 to its public outside interface IP Address 198.51.100.37 with a random port number such as 48324. The traffic then gets forwarded to the ISP using the public routable IP Address and is routed towards Google. Traffic returning from Google would return to the destination 198.51.100.37:48324 which is the firewall, the firewall processes the return traffic and translates it based on the NAT translation table and forwards it back to the original source 10.1.1.0:3948
So now that you got a general understanding of how dynamic NAT works on the firewall, lets talk about how to configure it out on the ASA.
Unlike the Cisco IOS software which runs on Routers, the ASA Software is a little different. First lets talk about how NAT is processed on the ASA in the order of configuration.
There are 3 sections of NAT on the Cisco ASA when running ASA 8.3 or later. The first Section is known as Manual Nat, this is where you can configure dynamic, policy, NAT exemption and identity NAT. This section is processed in the order of line number. When configure NAT entries you have the ability to specify line number to insert a NAT entry above or below existing entries to ensure that NAT is processed correctly.
The second section known as Auto NAT functions much as NAT did back in 8.2 whereas the longest match related to the traffic being NAT’ed is used. There are no line numbers in Section 2 as it is based on longest traffic flow match. This section is where your static NAT and static PAT (Port Address Translation, AKA: Port Fowarding) occurs.
The third section is just like Section 1 however it is processed after Section 1 and 2. This section is known as “After-Auto” Manual NAT. This section is used for the same types of NAT policies that you would find in Section 1 but need to be processed after Section 2, for example, Dynamic Internet NAT policies.
Lets look at Section 2 and Section 3 closer, Lets say you have a static PAT to forward public traffic to a private internal web server. This would be configured in Section 2, however lets say you also have a Dynamic NAT policy for all internal traffic to reach the internet in section one. When traffic going to the web server gets translated by Section 2 inbound, traffic returning to the source would be translated by Section 1 as that policy matches first and would fail because the source would not recognize the return traffic and would be dropped by the original source. In this case the Dynamic NAT policy used for the internet is commonly placed in the After-Auto section so that all prior NAT policies are processed first.
In order to build a dynamic NAT policy you must first define an object or object group which identifies the source network. In this case we’re going to use an object-group to define the 10.1.1.0/24 and 10.1.10.0/24 networks which are located on the “INSIDE” zone of the ASA.
Afterwards you define the object(s) you build the NAT policy using a single command nat (INSIDE,OUTSIDE) after-auto source dynamic DNAT_NETWORKS_INSIDE_TO_OUTSIDE interface
The (INSIDE,OUTSIDE) defines the flow of traffic, from the inside zone to the outside zone. We’re playing this NAT policy in the after-auto section (Section 3) and the source is dynamic as defined by the object-group DNAT_NETWORKS_INSIDE_TO_OUTSIDE. Lately we’re NAT’ing the traffic to the OUTSIDE interface IP Address.
To verify this configuration you would use the show nat command as shown below;
FW1# show nat
Manual NAT Policies (Section 3)
1 (INSIDE) to (OUTSIDE) source dynamic DNAT_NETWORKS_INSIDE_TO_OUTSIDE interface
    translate_hits = 0, untranslate_hits = 0
FW1#
Because no other NAT policies are defined, the show nat command is only showing the dynamic NAT policy in section 3.
The last command that we’re going to look at is show xlate
This command has been around since the PIX days which is used to show the translation table. An example is provided below;
FW1# show xlate
2 in use, 2 most used
Flags: D - DNS, e - extended, I - identity, i - dynamic, r - portmap,
       s - static, T - twice, N - net-to-net
NAT from OUTSIDE:0.0.0.0/0 to INSIDE:0.0.0.0/0
    flags sIT idle 0:00:07 timeout 0:00:00
ICMP PAT from INSIDE:10.1.1.2/2 to OUTSIDE:198.51.100.37/2 flags ri idle 0:00:07 timeout 0:00:30
FW1#
Commands You Should Know
As a network engineer implementing the technologies outlined in this lab you should be familiar with the following commands provided in the table below;
| Command | Description |
|---|---|
| nat (SOURCE,DESTINATION) after-auto dynamic {OBJECT_GROUP} interface | This command when executed in global configuration defines a dynamic NAT policy whereas the source and destination zones are defined. This policy is placed in Section 3 and matches objects sourced by networks defined by the object group. This traffic is NAT’d to the IP Address of the Destination Interface. |
| show nat | This command when executed shows existing configured NAT policies on the Cisco ASA |
| show xlate | This command when executed shows all current entries in the NAT translation table. |
Lab Device Initial Configuration(s)
In Section 7 you’ll only be configuring FW1. You will however use other lab devices to verify your configuration on FW1.
If you completed the previous lab you can continue where you left off otherwise you’ll need to load the following initial configurations into their respective device(s);
Section 7 Pre-Configured Lab Device(s)
The following lab devices have been pre-configured to save you time as you’ll only be working with FW1 in Section 7.
In order to complete the labs in section 7 you MUST load the following pre-configuration(s);
Before you Start
This lab requires that you have access to a Cisco ASA. You can complete this lab using a virtual Cisco ASA within GNS3 or you can reserve free lab time on the Stub Lab to have access to a pair of Cisco ASA 5510 Series Firewalls which can be used to complete this lab.
Lab Objectives
In this lab you will complete the following objectives.
- Create an Object-group that defines the 10.1.1.0/24 and 10.10.10.10/32 network.
- Create an after-auto dynamic NAT policy that translates all networks sourced in the define dobject group to the OUTSIDE interface IP Address
- Verify the operational status of the newly created NAT Policy by pinging 4.2.2.2 sourced from R1’s Loopback0 interface.
- Verify that the ping test is showing up in the ASA’s translation table.
One More Thing…
It is recommended that you attempt to complete these lab objectives the first time without looking at the Lab Instruction section.
If you are a student preparing for the Cisco CCNA Security Certification Exam than you are more likely to remember how to complete these objectives if you attempt to complete them the first time on your own with the use of the core knowledge section found in this lab. You should only resort to the Lab Instruction section to verify your work.
Lab Instruction
Objective 1. – Create an Object-group that defines the 10.1.1.0/24 and 10.10.10.10/32 network.
FW1# config terminal
FW1(config)# config terminal
FW1(config)# object-group network INSIDE_TO_OUTSIDE_DYNAMIC_NAT_NETS
FW1(config-network-object-group)# network-object 10.1.1.0 255.255.255.0
FW1(config-network-object-group)# network-object 10.10.10.10 255.255.255.255
FW1(config-network-object-group)# exit
FW1(config)#
Objective 2. – Create an after-auto dynamic NAT policy that translates all networks sourced in the defined object group to the OUTSIDE interface IP Address
FW1(config)# nat (INSIDE,OUTSIDE) after-auto source dynamic INSIDE_TO_OUTSIDE_DYNAMIC_NAT_NETS interface
FW1(config)# end
FW1#
Objective 3. – Verify your Dynamic NAT policy configuration on the ASA by viewing all NAT policies on the ASA.
FW1# show nat

Manual NAT Policies (Section 3)
1 (INSIDE) to (OUTSIDE) source dynamic INSIDE_TO_OUTSIDE_DYNAMIC_NAT_NETS interface
    translate_hits = 0, untranslate_hits = 0
FW1#
Objective 4. – Verify the operational status of the newly created NAT Policy by pinging 4.2.2.2 sourced from R1’s Loopback0 interface.
R1#R1#ping 4.2.2.2 source loopback0 size 1472 repeat 10000
Type escape sequence to abort.
Sending 10000, 1472-byte ICMP Echos to 4.2.2.2, timeout is 2 seconds:
Packet sent with a source address of 10.10.10.10
!!!!!!!!!!!!!!!!!!!!!!!!!!!!!!!!!!!!!!!!!!!!!!!!!!!!!!!!!!!!!!!!!!!!!!
!!!!!!!!!!!!!!!!!!!!!!!!!!!!!!!!!!!!!!!!!!!!!!!!!!!!!!!!!!!!!!!!!!!!!!
!!!!!!!!!!!!!!!!!!!!!!!!!!!!!!!!!!!!!!!!!!!!!!!!!!!!!!!!!!!!!!!!!!!!!!
!!!!!!!!!!!!!!!!!!!!!!!!!!!!!!!!!!!!!!!!!!!!!!!!!!!!!!!!!!!!!!!!!!!!!!
!!!!!!!!!!!!!!!!!!!!!!!!!!!!!!!!!!!!!!!!!!!!!!!!!!!!!!!!!!!!!!!!!!!!!!
!!!!!!!!!!!!!!!!!!!!!!!!!!!!!!!!!!!!!!!!!!!!!!!!!!!!!!!!!!!!!!!!!!!!!!
!!!!!!!!!!!!!!!!!!!!!!!!!!!!!!!!!!!!!!!!!!!!!!!!!!!!!!!!!!!!!!!!!!!!!!
!!!!!!!!!!!!!!!!!!!!!!!!!!!!!!!!!!!!!!!!!!!!!!!!!!!!!!!!!!!!!!!!!!!!!!
### TRUNCATED ###
Objective 5. – Verify that the ping test is showing up in the ASA’s translation table.
FW1(config)# object-group network INSIDE_TO_OUTSIDE_DYNAMIC_NAT_NETS
FW1# show xlate
2 in use, 3 most used
Flags: D - DNS, e - extended, I - identity, i - dynamic, r - portmap,
       s - static, T - twice, N - net-to-net
NAT from OUTSIDE:0.0.0.0/0 to INSIDE:0.0.0.0/0
    flags sIT idle 0:00:04 timeout 0:00:00
ICMP PAT from INSIDE:10.10.10.10/6 to OUTSIDE:198.51.100.37/6 flags ri idle 0:00:04 timeout 0:00:30
FW1#
