Configuring SSH and HTTPS Management Access
Protect your SSH and HTTPS management traffic from prying eyes by encrypting the packets that traverse your network using RSA certificates.
- Core Knowledge
- Lab Topology
- Initial Configs
- Lab Objectives
- Lab Instruction
Core Knowledge and Real World Scenarios
You would never mail a private letter at the post office without using an envelope to keep it from prying eyes so why would you send your management traffic in clear text across the wire?
Telnet and HTTP are unencrypted technologies that transmit the payload in clear text. Any individual can use wireshark and sniff traffic to determine usernames and passwords on telnet tcp streams. Same goes for HTTP post variables.
Even if you secure your device using authentication, if you do not secure how people authenticate to that device, then even having the most secure password would never be secure enough for the man in the middle.
Configuring SSH and HTTPS requires the use of a general use RSA public/private keys. In order to generate this you must first set a domain name for the device by using the ip domain-name NAME.TLD command in global configuration.
Once set you then generate the general-use keys by executing the command crypto key generate rsa general-keys modulus {360-4096} whereas 2048 is the most common.
Once general use keys have been generated the Cisco IOS device will automatically enable SSH however you must manually disable TELNET on the VTY lines.
As for HTTPS, you must manually enable this service using the ip http secure-server command in global config and disable the unsecure web server by using the no ip http server command.
To disable HTTP services use the no ip http server command in global configuration. To disable TELNET on the VTY lines and only accept SSH execute the transport input ssh command under vty line configuration mode.
You can SSH between IOS devices by using the ssh -l {username} a.b.c.d command from privileged mode whereas a.b.c.d is the target IP Address.
Familiarize yourself with the list of command(s) compiled below;
| Command | Description |
|---|---|
| ip domain-name {NAME.TLD} | This command when executed in global configuration mode will set the device’s domain name. |
| crypto key generate rsa general-keys modulus 2048 | This command when executed in global configuration generates a 2048bit RSA key pair. |
| transport input ssh | This command when executed in vty line configuration mode enables ONLY SSH on the virtual terminal lines. |
| ssh -l {username} a.b.c.d | This command when executed in privileged mode establishes an SSH session with the target IP Address using the provided username. If no username is provided the current authenticated username will be used. |
| ip http secure-server | This command when executed in global configuration will enable HTTPS connections to IOS for management if a general use key-pair exist. |
| no ip http server | This command when executed in global configuration will disable the unsecure http service running by default on Cisco IOS. |
To get started with this lab exercise please review the lab topology and prerequisites prior to loading initial configs and attempting the objective(s).
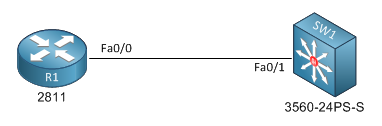
Lab Logical Topology
The following logical topology is used in all labs found through out Section 2 of the CCNA Security Workbook;
To view the physical cabling topology please visit the Topology page.
Lab Device Initial Configurations
Before you Start
This lab requires that you have access to a Cisco IOS Device. You can complete this lab using a router in GNS3 or you can reserve free lab time on the Stub Lab to have access to a fully functional Cisco CCIE lab which has first generation Integrated Service Routers, 3560 Series Catalyst Switches, 5505 ASA Firewalls and 2650XM series backbone routers.
It is recommended that you load the initial configurations onto your device prior to attempting this lab.
Lab Objectives
In this lab you will complete the following objectives.
- This lab can be completed using GNS3 however it was designed to be performed on real hardware.
- Establish a console session with R1 and SW1, configure their respective hostname(s).
- If you choose, you may load the initial configurations provided in this lab as a base configuration prior to starting the lab.
One More Thing…
It is recommended that you attempt to complete these lab objectives the first time without looking at the Lab Instruction section.
If you are a student preparing for the Cisco CCNA Security Certification Exam than you are more likely to remember how to complete these objectives if you attempt to complete them the first time on your own with the use of the core knowledge section found in this lab. You should only resort to the Lab Instruction section to verify your work.
Lab Instruction
Objective 1. – On R1 set the domain name to stub.lab and generate a 2048 bit general use key pair.
R1 con0 is now available


Press RETURN to get started.


User Access Verification

Username: cisco
Password:

R1>enable
R1#config t
Enter configuration commands, one per line.  End with CNTL/Z.
R1(config)#ip domain-name stub.lab
R1(config)#crypto key generate rsa general-keys modulus 2048
The name for the keys will be: R1.stub.lab

% The key modulus size is 2048 bits
% Generating 2048 bit RSA keys, keys will be non-exportable...
[OK] (elapsed time was 14 seconds)

R1(config)#
%SSH-5-ENABLED: SSH 1.99 has been enabled
R1(config)#
Objective 2. – Configure R1 to only allow SSH vty sessions and HTTPS web sessions.
R1(config)#line vty 0 4
R1(config-line)#transport input ssh
R1(config-line)#exit
R1(config)#ip http secure-server
R1(config)#no ip http server
R1(config)#end
R1#
Objective 3. – Verify your configurations by using SW1 as a test client.
SW1#ssh -l cisco 10.1.1.2

Password:

R1>exit

[Connection to 10.1.1.2 closed by foreign host]
SW1#telnet 10.1.1.2 443
Trying 10.1.1.2, 443 ... Open


[Connection to 10.1.1.2 closed by foreign host]
SW1#
