Configuring Static Routes on the ASA
Who knew the Cisco ASA Firewall could be a router? This lab will discuss and demonstrate the configuration and verification of static routing on the Cisco ASA firewall.
- Core Knowledge
- Lab Topology
- Initial Configs
- Lab Objectives
- Lab Instruction
Core Knowledge and Real World Scenarios
By default the Cisco ASA operates in “Routed” mode which by definition means it acts like a router but also has DPI firewall capabilities. You can configure the Cisco ASA to do static routing which is commonly used for a magnitude of scenarios such as default routes or vpn routing. Static routing on the Cisco ASA can also support IP SLA tracking to ensure the next-hop is reachable however that is outside of the scope of the CCNA Security exam.
The most common static route you’ll see on a Cisco ASA is the default route. This route operates in the same manner as a default route on a Cisco IOS device. By routing 0.0.0.0/0 to a specific next-hop you can use this route as a “catch-all” for any traffic destined to a destination that does not have a longer match in the routing table.
There is two small differences on the ASA compared to a Cisco IOS based device. When configuring static routes on a Cisco ASA, you must also specify the egress interface and the command is just route, not ip route. An example; route ifName x.x.x.x y.y.y.y z.z.z.z whereas X is the IP address, Y is the subnet mask and Z is the next hop.
Familiarize yourself with the following command(s);
| Command | Description |
|---|---|
| route ifName x.x.x.x y.y.y.y z.z.z.z | This command is executed in global configuration mode to set a static route whereas X equals the IP Address, Y equals the Subnet Mask and Z equals the next-hop IP address. |
Lab Logical Topology
The following logical topology is used in all labs found through out Section 7 of the CCNA Security Workbook;
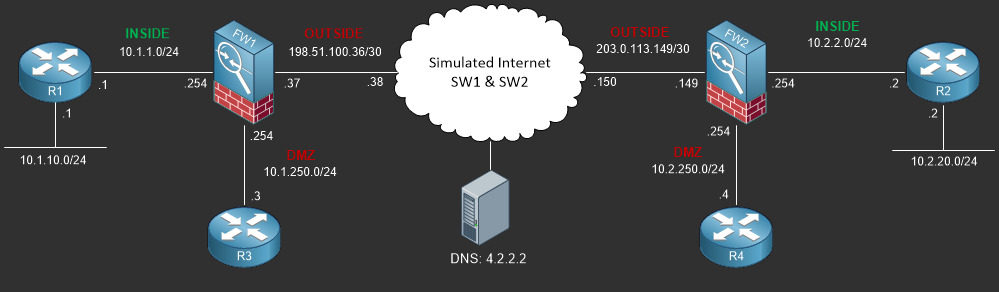
To view the physical cabling topology please visit the Topology page.
Lab Device Initial Configurations
In Section 7 you’ll only be configuring FW1. You will however use other lab devices to verify your configuration on FW1.
If you completed the previous lab you can continue where you left off otherwise you’ll need to load the following initial configurations into their respective device(s);
Section 7 Pre-Configured Lab Device(s)
The following lab devices have been pre-configured to save you time as you’ll only be working with FW1 in Section 7.
In order to complete the labs in section 7 you MUST load the following pre-configuration(s);
Before you Start
This lab requires that you have access to a Cisco ASA. You can complete this lab using a virtual Cisco ASA within GNS3 or you can reserve free lab
time on the Stub Lab to have access to a pair of Cisco ASA 5510 Series Firewalls which can be used to complete this lab.
Lab Objectives
In this lab you will complete the following objectives.
- Configure a static default route on FW1 pointing towards the ISP’s IP Address provided in the topology.
- Verify internet connectivity by pinging public DNS Server 4.2.2.2
One More Thing…
It is recommended that you attempt to complete these lab objectives the first time without looking at the Lab Instruction section.
If you are a student preparing for the Cisco CCNA Security Certification Exam than you are more likely to remember how to complete these
objectives if you attempt to complete them the first time on your own with the use of the core knowledge section found in this lab. You should
only resort to the Lab Instruction section to verify your work.
Lab Instruction
Objective 1. – Configure a static default route on FW1 pointing towards the ISP’s IP Address provided in the topology.
####################################
#  UNAUTHORIZED ACCESS PROHIBITED  #
####################################
Username: cisco
Password: *****
##############################################
#  CONTACT JOHN PRIOR TO MAKING ANY CHANGES  #
##############################################
Type help or '?' for a list of available commands.
FW1> enable
Password: *****
FW1# config terminal
FW1(config)# route OUTSIDE 0.0.0.0 0.0.0.0 198.51.100.38
FW1(config)# end
FW1#
Objective 2. – Verify internet connectivity by pinging public DNS Server 4.2.2.2
FW1# ping 4.2.2.2
Type escape sequence to abort.
Sending 5, 100-byte ICMP Echos to 4.2.2.2, timeout is 2 seconds:
!!!!!
Success rate is 100 percent (5/5), round-trip min/avg/max = 1/2/10 ms
FW1#
You should note that the FW1 is able to ping 4.2.2.2 due to the simulated internet cloud having a loopback interface with the ip address 4.2.2.2/32 assigned to it.
