Dynamic Routing on the Cisco ASA
Since the Cisco ASA function like a router in routed mode it can also perform dynamic routing using RIP, EIGRP and OSPF. This lab will discuss and demonstrate the configuration and verification of dynamic routing on the Cisco ASA platform.
- Core Knowledge
- Lab Topology
- Initial Configs
- Lab Objectives
- Lab Instruction
Core Knowledge and Real World Scenarios
Configuring a Cisco ASA to do dynamic routing can be extremely beneficial. Configuring multiple static routes in any given network can raise the administrative overhead for network management. In an idea network you would want everything to just “automagically” work.
The Cisco ASA supports EIGRP, RIP and OSPF from a dynamic routing protocol perspective. The full protocol stacks are supported however the Cisco ASA is unable to use route-maps so with that in mind any functionality you would gain from route-maps on a Cisco IOS router, you would lose on the ASA Software.
The configuration of the dynamic routing protocols are nearly the same as you would configure them on a Cisco IOS Router. Using the router protocol # command in global config followed by the AS or Process number would place you into router configuration mode.
One of the major differences is that you do NOT use wildcard statements in router configuration mode on the Cisco ASA and doing so will result in the network becoming 0.0.0.0/0 thus making all interfaces participate in the routing process.
When configuring EIGRP or OSPF, you must specify the interface network ID along with the subnet mask. I.e; network 10.1.1.0 255.255.255.0 area 0
The ASA Supports EIGRP Stub Area’s, and OSPF Stub Area’s along with OSPF area summarization.
The Routing Information Protocol is also supported on RIPv1 and RIPv2.
The verification commands are slightly different from Cisco IOS. When verifying OSPF neighbors on a Cisco ASA you would use the show ospf neighbors command instead of the show ip ospf neighbors This same concept applies to RIP and EIGRP.
Familiarize yourself with the following command(s);
| Command | Description |
|---|---|
| router rip | This command when executed in global configuration mode starts the RIP process on the Cisco ASA. Networks can be added into the process by the network x.x.x.x y.y.y.y command whereas X is the subnet ID and Y is the subnet mask. |
| show rip database | This command when executed in privileged mode will display the contents of the RIP database. |
| router eigrp # | This command when executed in global configuration mode starts the EIGRP routing process followed by the Autonomous System number. Auto Summary is disabled by default and network statements are added via network x.x.x.x y.y.y.y whereas X is the subnet id and Y is the subnet mask. |
| show eigrp topology | This command when executed in privileged mode will display the contents of the EIGRP topology table. |
| router ospf # | This command when executed in global configuration mode starts the EIGRP routing process followed by the OSPF Process ID. Interfaces are added into the process via the network x.x.x.x y.y.y.y area # command whereas X is the subnet ID and Y is the subnet mask followed by the Area number. |
| show eigrp database | This command when executed in privileged mode will display the contents of the OSPF database. |
Lab Logical Topology
The following logical topology is used in all labs found through out Section 7 of the CCNA Security Workbook;
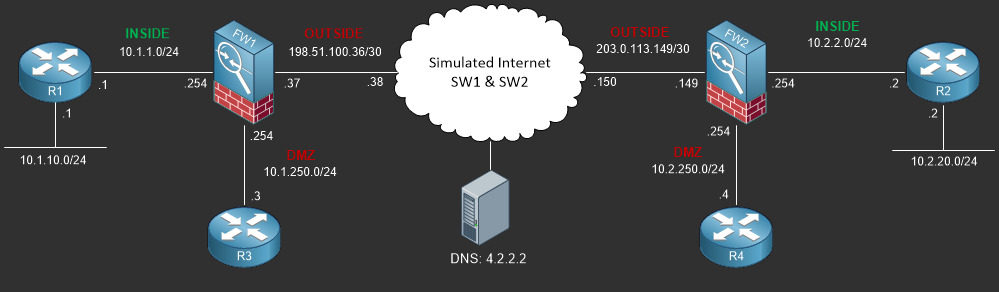
To view the physical cabling topology please visit the Topology page.
Lab Device Initial Configurations
In Section 7 you’ll only be configuring FW1. You will however use other lab devices to verify your configuration on FW1.
If you completed the previous lab you can continue where you left off otherwise you’ll need to load the following initial configurations into their respective device(s);
Section 7 Pre-Configured Lab Device(s)
The following lab devices have been pre-configured to save you time as you’ll only be working with FW1 in Section 7.
In order to complete the labs in section 7 you MUST load the following pre-configuration(s);
Before you Start
This lab requires that you have access to a Cisco ASA. You can complete this lab using a virtual Cisco ASA within GNS3 or you can reserve free lab
time on the Stub Lab to have access to a pair of Cisco ASA 5505 Series Firewalls which can be used to complete this lab.
Lab Objectives
In this lab you will complete the following objectives.
- Configure RIP version 2 on FW1 to advertise its DMZ network to R1. Verify your configuration. R1 has been pre-configured.
- Remove the previous RIP configuration and configure EIGRP AS 10 to advertise the DMZ network to R1 then verify your configuration. R1 has been pre-configured.
- Remove the previous EIGRP configuration and Configure OSPF Area 0 on the INSIDE interface and OSPF Area 51 on the DMZ interface. Verify that the DMZ network is being advertised to R1.
One More Thing…
It is recommended that you attempt to complete these lab objectives the first time without looking at the Lab Instruction section.
If you are a student preparing for the Cisco CCNA Security Certification Exam than you are more likely to remember how to complete these
objectives if you attempt to complete them the first time on your own with the use of the core knowledge section found in this lab. You should
only resort to the Lab Instruction section to verify your work.
Lab Instruction
Objective 1. – Configure RIP version 2 on FW1 to advertise its DMZ network to R1. Verify your configuration. R1 has been pre-configured.
Username: cisco
Password: *****
#####################################################
#  CONTACT JOHN PRIOR TO MAKING ANY CONFIG CHANGES  #
#####################################################
Type help or '?' for a list of available commands.
FW1> en
Password: *****
FW1# config term
FW1(config)# router rip
FW1(config-router)# version 2
FW1(config-router)# network 10.0.0.0
FW1(config-router)# end
FW1#
R1#show ip route
Codes: L - local, C - connected, S - static, R - RIP, M - mobile, B - BGP
       D - EIGRP, EX - EIGRP external, O - OSPF, IA - OSPF inter area
       N1 - OSPF NSSA external type 1, N2 - OSPF NSSA external type 2
       E1 - OSPF external type 1, E2 - OSPF external type 2
       i - IS-IS, su - IS-IS summary, L1 - IS-IS level-1, L2 - IS-IS level-2
       ia - IS-IS inter area, * - candidate default, U - per-user static route
       o - ODR, P - periodic downloaded static route, H - NHRP, l - LISP
       + - replicated route, % - next hop override

Gateway of last resort is 10.1.1.254 to network 0.0.0.0

S*    0.0.0.0/0 [250/0] via 10.1.1.254
      1.0.0.0/32 is subnetted, 1 subnets
C        1.1.1.1 is directly connected, Loopback0
      10.0.0.0/8 is variably subnetted, 5 subnets, 2 masks
C        10.1.1.0/24 is directly connected, FastEthernet0/0
L        10.1.1.1/32 is directly connected, FastEthernet0/0
C        10.1.10.0/24 is directly connected, FastEthernet0/1
L        10.1.10.1/32 is directly connected, FastEthernet0/1
R     10.1.250.0/24 [120/1] via 10.1.1.254, 00:00:08, FastEthernet0/0
R1#
Objective 2. – Remove the previous RIP configuration and configure EIGRP AS 10 to advertise the DMZ network to R1 then verify your configuration. R1 has been pre-configured.
FW1# config t
FW1(config)# no router rip
FW1(config)# router eigrp 10
FW1(config-router)# network 10.0.0.0 255.0.0.0
FW1(config-router)# end
FW1#
R1#
%DUAL-5-NBRCHANGE: EIGRP-IPv4 10: Neighbor 10.1.1.1 (FastEthernet0/0) is up: new adjacency
R1#
R1#show ip route
Codes: L - local, C - connected, S - static, R - RIP, M - mobile, B - BGP
       D - EIGRP, EX - EIGRP external, O - OSPF, IA - OSPF inter area
       N1 - OSPF NSSA external type 1, N2 - OSPF NSSA external type 2
       E1 - OSPF external type 1, E2 - OSPF external type 2
       i - IS-IS, su - IS-IS summary, L1 - IS-IS level-1, L2 - IS-IS level-2
       ia - IS-IS inter area, * - candidate default, U - per-user static route
       o - ODR, P - periodic downloaded static route, H - NHRP, l - LISP
       + - replicated route, % - next hop override

Gateway of last resort is 10.1.1.254 to network 0.0.0.0

S*    0.0.0.0/0 [250/0] via 10.1.1.254
      1.0.0.0/32 is subnetted, 1 subnets
C        1.1.1.1 is directly connected, Loopback0
      10.0.0.0/8 is variably subnetted, 5 subnets, 2 masks
C        10.1.1.0/24 is directly connected, FastEthernet0/0
L        10.1.1.1/32 is directly connected, FastEthernet0/0
C        10.1.10.0/24 is directly connected, FastEthernet0/1
L        10.1.10.1/32 is directly connected, FastEthernet0/1
D     10.1.250.0/24 [90/30720] via 10.1.1.254, 00:00:08, FastEthernet0/0
R1#
Objective 3. – Remove the previous EIGRP configuration and Configure OSPF Area 0 on the INSIDE interface and OSPF Area 51 on the DMZ interface. Verify that the DMZ network is being advertised to R1.
FW1# config t
FW1(config)# no router eigrp 10
FW1(config)# router ospf 1
FW1(config-router)# network 10.1.1.0 255.255.255.0 area 0
FW1(config-router)# network 10.1.250.0 255.255.255.0 area 51
FW1(config-router)# end
FW1#
R1#
%OSPF-5-ADJCHG: Process 10, Nbr 198.51.100.37 on FastEthernet0/0 from LOADING to FULL, Loading Done
R1#
R1#show ip route
Codes: L - local, C - connected, S - static, R - RIP, M - mobile, B - BGP
       D - EIGRP, EX - EIGRP external, O - OSPF, IA - OSPF inter area
       N1 - OSPF NSSA external type 1, N2 - OSPF NSSA external type 2
       E1 - OSPF external type 1, E2 - OSPF external type 2
       i - IS-IS, su - IS-IS summary, L1 - IS-IS level-1, L2 - IS-IS level-2
       ia - IS-IS inter area, * - candidate default, U - per-user static route
       o - ODR, P - periodic downloaded static route, H - NHRP, l - LISP
       + - replicated route, % - next hop override

Gateway of last resort is 10.1.1.254 to network 0.0.0.0

S*    0.0.0.0/0 [250/0] via 10.1.1.254
      1.0.0.0/32 is subnetted, 1 subnets
C        1.1.1.1 is directly connected, Loopback0
      10.0.0.0/8 is variably subnetted, 5 subnets, 2 masks
C        10.1.1.0/24 is directly connected, FastEthernet0/0
L        10.1.1.1/32 is directly connected, FastEthernet0/0
C        10.1.10.0/24 is directly connected, FastEthernet0/1
L        10.1.10.1/32 is directly connected, FastEthernet0/1
O IA     10.1.250.0/24 [110/11] via 10.1.1.254, 00:00:08, FastEthernet0/0
R1#
