Telnet and SSH Management Access
Configuring remote management on the Cisco ASA is a requirement before installing a firewall in the field. This lab will discuss and demonstrate the configuration and verification of telnet and SSH remote management access.
- Core Knowledge
- Lab Topology
- Initial Configs
- Lab Objectives
- Lab Instruction
Core Knowledge and Real World Scenarios
As with any Cisco device you must be able to manage the device remotely via SSH or Telnet. Preferably SSH. Anyone using Telnet to manage a device used to prevent unauthorized access is clearly asking for it.
Configuring SSH on the Cisco ASA is significantly different from the Cisco IOS configuration. While there are some similarities such as a RSA key must be generated and a domain name must be set first, the way you enable SSH is fundamentally different and inherently more secure on the Cisco ASA.
When generating the RSA keys, this command is identical to the Cisco IOS. First you must set the domain name using the domain-name domain.tld command then you create the RSA keys usin the same command you would use on a Cisco IOS Device; crypto key generate rsa general-keys modulus 2048
Once the RSA key’s have been generated you can then enable SSH. To enable SSH you must specify a network ID and subnet followed by the specific interface in which the SSHd (SSH Daemon) must listen on. Example; ssh 10.1.0.0 255.255.255.0 INSIDE
Telnet is configured in the same manner minus the RSA key configuration. It is HIGHLY recommended that you never use telnet to manage a Cisco ASA in a production environment.
Keep in mind that in order for you to authenticate to the Firewall using SSH or Telnet you must specify the AAA Authentication parameters. To configure SSH to authenticate to the local user database you would use the aaa authentication ssh console LOCAL command whereas with telnet you would use the aaa authentication telnet console LOCAL command.
Familiarize yourself with the following command(s);
| Command | Description |
|---|---|
| domain-name DOMAIN.TLD | When executed in global configuration this command sets the device’s domain name which is also used during crypto key generation. |
| crypto key generate rsa | This command is executed in global configuration mode to generate RSA general usage keys. You can specify the key-length using the modulus command followed by the key size. |
| telnet x.x.x.x y.y.y.y ifName | This command when executed in global configuration mode enables telnet on the specified interface for the specified subnet whereas X is the subnet ID and Y is the subnet mask. |
| ssh x.x.x.x y.y.y.y ifName | This command when executed in global configuration mode enables SSH on the specified interface for the specified subnet whereas X is the subnet ID and Y is the subnet mask. |
| aaa authentication SSH|TELNET console LOCAL | This command when executed in global configuration mode to make incoming SSH or TELNET sessions to authenticate to the local user database. |
Lab Logical Topology
The following logical topology is used in all labs found through out Section 7 of the CCNA Security Workbook;
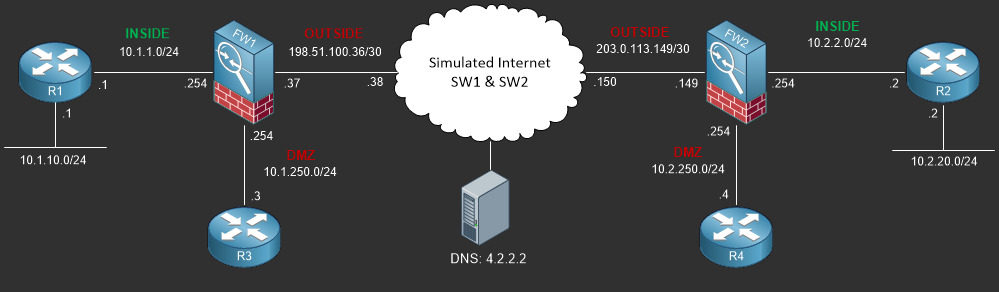
To view the physical cabling topology please visit the Topology page.
Lab Device Initial Configurations
In Section 7 you’ll only be configuring FW1. You will however use other lab devices to verify your configuration on FW1.
If you completed the previous lab you can continue where you left off otherwise you’ll need to load the following initial configurations into their respective device(s);
Section 7 Pre-Configured Lab Device(s)
The following lab devices have been pre-configured to save you time as you’ll only be working with FW1 in Section 7.
In order to complete the labs in section 7 you MUST load the following pre-configuration(s);
Before you Start
This lab requires that you have access to a Cisco ASA. You can complete this lab using a virtual Cisco ASA within GNS3 or you can reserve free lab time on the Stub Lab to have access to a pair of Cisco ASA 5510 Series Firewalls which can be used to complete this lab.
Lab Objectives
In this lab you will complete the following objectives.
- Configure FW1 to permit remote telnet management access for the host 1.1.1.1/32 on the INSIDE interface.
- Configure FW1 to permit remote SSH management access for the 10.1.1.0/24 subnet on the INSIDE interface.
One More Thing…
It is recommended that you attempt to complete these lab objectives the first time without looking at the Lab Instruction section.
If you are a student preparing for the Cisco CCNA Security Certification Exam than you are more likely to remember how to complete these objectives if you attempt to complete them the first time on your own with the use of the core knowledge section found in this lab. You should only resort to the Lab Instruction section to verify your work.
Lab Instruction
Objective 1. – Configure FW1 to permit remote telnet management access for the host 1.1.1.1/32 on the INSIDE interface.
####################################
#  UNAUTHORIZED ACCESS PROHIBITED  #
####################################
Username: cisco
Password: *****
#####################################################
#  CONTACT JOHN PRIOR TO MAKING ANY CONFIG CHANGES  #
#####################################################
Type help or '?' for a list of available commands.
FW1> en
Password: *****
FW1# config t
FW1(config)# aaa authentication telnet console LOCAL
FW1(config)# telnet 1.1.1.1 255.255.255.255 INSIDE
FW1(config)# end
FW1#
R1#telnet 10.1.1.254 /source-interface lo0
Trying 10.1.1.254 ... Open
#####################################################
#  CONTACT JOHN PRIOR TO MAKING ANY CONFIG CHANGES  #
#####################################################
####################################
#  UNAUTHORIZED ACCESS PROHIBITED  #
####################################


User Access Verification

Username: cisco
Password: *****
Type help or '?' for a list of available commands.
FW1> exit

Logoff


[Connection to 10.1.1.254 closed by foreign host]
R1#
Objective 2. – Configure FW1 to permit remote SSH management access for the 10.1.1.0/24 subnet on the INSIDE interface.
FW1# config t FW1(config)# domain-name freeccnaworkbook.com FW1(config)# crypto key generate rsa INFO: The name for the keys will be:Keypair generation process begin. Please wait... FW1(config)# ssh 10.1.1.0 255.255.255.0 INSIDE FW1(config)# aaa authentication ssh console LOCAL FW1(config)# end FW1#
R1#ssh -l cisco 10.1.1.254
####################################
#  UNAUTHORIZED ACCESS PROHIBITED  #
####################################

Password:
#####################################################
#  CONTACT JOHN PRIOR TO MAKING ANY CONFIG CHANGES  #
#####################################################
Type help or '?' for a list of available commands.
FW1> exit

Logoff


[Connection to 10.1.1.254 closed by foreign host]
R1#
