Configuring IPv6 Interface Addressing
So you know how IPv6 works but how do you assign IPv6 addresses to Cisco Router and Switch interfaces? This lab will discuss and demonstrate the configuration and verification of IPv6 interface addressing.
Real World Application & Core Knowledge
If you’ve read Lab 12-1 – The Basics of Internet Protocol Version 6 (IPv6) then you’re probably tired of reading about all the concepts, history and such and ready to get into the configuration.
Configuring an IPv6 address is just as easy as configuring an IPv4 address on a Cisco interface; however an understanding of IPv6 is required. If you’re not familiar with IPv6 then its highly recommended that you check out Lab 12-1.
There are several commands that have been ported over to suit the needs of IPv6 on a Cisco router such as show ip interface brief for ipv6 is show ipv6 interface brief. Also show ip route for IPv6 is now show ipv6 route. You should take the time to experiment and discover new commands relating to IPv6 by using the Cisco IOS context sensitive help. (The question mark in Cisco IOS)
To configure an IPv6 address on a Cisco interface you’ll use the ipv6 address X:X:X:X::X/<0-128> command in interface configuration mode. Note that IPv6 addressing does not use a subnet mask explicitly following the address but uses the CIDR bit notation. Examples; IPv4 address 10.55.82.23/24, IPv6 Address: 2001:dabd:32bf::1/64. Keep in mind the host ID portion of a IPv6 address is 64 bits in length. (half of the IPv6 IP address)
Auto configuration is one of the big advantages of IPv6, the ability for a node to auto-configure a global unique IPv6 address without the need of an IPv6 DHCP server is very appealing to businesses looking to same some dime.
Before you dive into configuring IPv6 autoconfig first lets dive more into depth with how it works. IPv6 uses a mechanism called Neighbor Discovery Protocol (NDP), which gives IPv6 its unique plug-and-play features. NDP performs several functions which are listed below;
- Router Discovery – The ability for a node to discover local routers on a network segment without the aid of a DHCP server.
- Parameter Discovery – The ability for a node to discover link parameters such as MTU and hop limits for its links.
- Prefix Discovery – The ability for a node to discover the prefix or prefixes assigned to a specific IPv6 link.
- Address Autoconfiguration – The ability for a node to determine its full unique i address without the aid of a DHCP server.
- Duplicated Address Detection (DAD) – The ability for a node to determine rather or not an IPv6 address it attempts to use already exist.
- Address Resolution – The ability for a node to discover the link-layer addresses of other node(s) on a link without the use of Address Resolution Protocol (ARP).
- Next-Hop Determination – The ability for a node to determine the next link-layer hop on a network link; a local node or router destination.
- Neighbor Unreachability Detection – The ability for a node to determine when a neighboring device on the network link is no longer reachable.
- Redirect – The ability for a router to notify a host that a better path exist to reach a given destination.
Network Discovery Protocol messages should always be link-local originating. To add further security to NDP messages, the hop limit (IPv6 TTL) of the IPv6 packet carrying all NTP traffic is set to 255. (TTL) to ensure it does not traverse routers.
The Network Discovery Protocol is defined in RFC2461 which uses ICMPv6 to exchange messages required for its functions. Specifically, five new ICMPv6 messages are defined in RFc2461 which you be aware. These messages which are listed below are responsible for the operation of NDP;
- Router Advertisement (RA) – An RA is a message that originates from a Router, (Cisco or non-Cisco) to advertise their existence on a network link. These RA’s also include link parameters and are sent automatically periodically and in response of a Router Solicitation (RS) message.
- Router Solicitation (RS) – These messages originate from host nodes to request that any router on the link respond with a RA.
- Neighbor Solicitation (NS) – These messages are sent from a node requesting the link layer address of another node and also used by the duplicate address detection and neighbor unreachability detection mechanisms.
- Neighbor Advertisement (NA) – These messages are sent in response to a NS message. If a node changes its link-layer address then a NA can be used to send an unsolicited advertisement to advertise its new address.
- Redirect – These messages are used in the same fashion as IPv4 ICMP redirects however they have been migrated from ICMP in IPv4 to native operation NDP which uses ICMPv6 to function.
To configure IPv6 stateless auto configuration on an interface you first much configure the router to advertise its connected prefix on the link using the NDP Router Advertisement (RA) message(s). Without this advertisement the host on the network link will not know what address to autoconfig to.
To configure a Cisco router to advertise an IPv6 prefix out an Ethernet interface for neighbor IPv6 auto configuration you must first to enable IPv6 unicast routing on that router by executing the ipv6 unicast-routing command in global configuration. After IPv6 unicast routing is enabled you can then continue to configure the advertised prefixed by using the ipv6 nd prefix x:x:x:x::/x command in interface configuration mode. Once the prefix is configured the router will advertised the interface prefix specified in the Network Discovery Protocol (NDP) Router Advertisements (RA)’s periodically and upon receipt of a Router Solicitation (RS).
In this lab you will configure the FastEthernet0/0 interfaces of R1 and R2 whereas R1 will have a statically configured global unique IPv6 unicast address and R2 will auto configure its global unique IPv6 address on the link.
Familiarize yourself with the following new command(s);
| Command | Description |
|---|---|
| ipv6 unicast-routing | This command when executed in global configuration mode to enable IPv6 Unicast routing on a Cisco router and/or Switch. |
| ipv6 address X:X:X:X::X/ | This command when executed in interface configuration mode sets an IPv6 address on the specified interface. |
| ipv6 address autoconfig | This command when executed in interface configuration mode configures that specific interface to autoconfig its IPv6 address based on prefix advertisements from routers on that network segment. |
| ipv6 nd prefix x:x:x:x::/x | This command when executed in interface configuration mode configures which prefix or prefixes to advertise in its IPv6 NDP router advertisements (RA’s) which is used by neighboring nodes to auto configure an IPv6 address. |
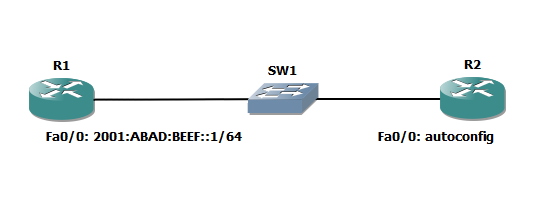
The following logical topology shown below is used in this lab;
Lab Prerequisites
- If you are using GNS3 than load the Free CCNA Workbook GNS3 topology than start devices; R1, R2 and SW1.
- Establish a console session with devices R1, R2 and SW1 than load the initial configurations provided below by copying the config from the textbox and pasting it into the respected routers console.
Lab Objectives
- Configure R1’s FastEthernet0/0 interface with the IPv6 address; 2001:abad:beef::1/64.
- Configure R1’s FastEthernet0/0 interface to advertise the 2001:abad:beef::/64 prefix in the NDP Router advertisements onto the Ethernet segment.
- Configure R2’s FastEthernet0/0 interface to autoconfig its IPv6 global unique unicast address, wait a few minutes and verify that this interfaces auto configures a global unique IPv6 address.
- Verify IPv6 communication between R2 and R1 using ping.
Lab Instruction
Objective 1. – Configure R1’s FastEthernet0/0 interface with the IPv6 address; 2001:abad:beef::1/64.
R1>enable
R1#configure terminal
Enter configuration commands, one per line.  End with CNTL/Z.
R1(config)#ipv6 unicast-routing
R1(config)#interface FastEthernet0/0
R1(config-if)#ipv6 address 2001:abad:beef::1/64
R1(config-if)#no shut
R1(config-if)#
Objective 2. – Configure R1’s FastEthernet0/0 interface to advertise the 2001:abad:beef::/64 prefix in the NDP Router advertisements onto the Ethernet segment.
R1(config-if)#ipv6 nd prefix 2001:abad:beef::/64
R1(config-if)#end
R1#
Objective 3. – Configure R2’s FastEthernet0/0 interface to autoconfig its IPv6 global unique unicast address, wait a few minutes and verify that this interfaces auto configures a global unique IPv6 address.
R2>enable
R2#configure terminal
Enter configuration commands, one per line.  End with CNTL/Z.
R2(config)#interface FastEthernet0/0
R2(config-if)#ipv6 address autoconfig
R2(config-if)#no shut
R2(config-if)#end
R2#
R2#show ipv6 interface FastEthernet0/0
FastEthernet0/0 is up, line protocol is up
  IPv6 is enabled, link-local address is FE80::C800:7FF:FE14:8
  No Virtual link-local address(es):
  Description: ### LINK TO LAN ###
  Stateless address autoconfig enabled
  Global unicast address(es):
    2001:ABAD:BEEF:0:C800:7FF:FE14:8, subnet is 2001:ABAD:BEEF::/64
[EUI/CAL/PRE]
      valid lifetime 2591992 preferred lifetime 604792
  Joined group address(es):
    FF02::1
    FF02::2
    FF02::1:FF14:8
  MTU is 1500 bytes
  ICMP error messages limited to one every 100 milliseconds
  ICMP redirects are enabled
  ICMP unreachables are sent
  ND DAD is enabled, number of DAD attempts: 1
  ND reachable time is 30000 milliseconds (using 37387)
  ND advertised reachable time is 0 (unspecified)
  ND advertised retransmit interval is 0 (unspecified)
  ND router advertisements are sent every 200 seconds
  ND router advertisements live for 1800 seconds
  ND advertised default router preference is Medium
  Hosts use stateless autoconfig for addresses.
Objective 4. – Verify IPv6 communication between R2 and R1 using ping.
R2#ping ipv6 2001:abad:beef::1 source FastEthernet0/0

Type escape sequence to abort.
Sending 5, 100-byte ICMP Echos to 2001:ABAD:BEEF::1, timeout is 2 seconds:
Packet sent with a source address of 2001:ABAD:BEEF:0:C800:7FF:FE14:8
!!!!!
Success rate is 100 percent (5/5), round-trip min/avg/max = 0/77/268 ms
R2#
