Configuring Multiple OSPF Areas
When it comes to building scalable OSPF networks, you will commonly use multiple OSPF Areas. This lab will discuss and demonstrate the configuration and verification of multi-area OSPF.
Real World Application & Core Knowledge
After completing the first 4 Labs found in the OSPF section you should have a good foundation of configuring OSPF. Now its time to build onto that foundation by learning how to configure multiple area’s in OSPF to segregate the routed network for management and resource conservation benefits. Take a step back and look at it this way, designing a network using multiple area’s gives you an easy network to troubleshoot when something blows up. For example facility one is OSPF area 1, facility 2 is OSPF area two, this gives you the ability to isolate network problems to a site/facility level.
You can conserve router resources as a specific router in a given area only has to maintain the database for that configured area. However Area Boarder Routers maintain a copy of the entire OSPF topology thus these routers need to be able to handle such performance requirements such as a Catalyst 6500 layer 3 switch, 7600 Series routers, 7200 series routers, or even 3800/3900 Series Integrated Services Routers.
An online poll done by a highly respectable network media website showed that the average OSPF network contains 50-75 areas. Keep in mind that not every single building has to be its own OSPF area, a general rule of thumb when designing OSPF area’s is that a single area could contain up to 250 routers and a few hundred intra-area routes.
To configure a new area the command is identical to configuring the backbone area but instead of specifying area 0 after the network statement you specify the new area number. Remember Area 0 is the backbone area and all traffic traversing the network from one area to another area MUST!!! traverse the backbone area.
In this lab you will configure six new area’s; one for each router that contains the routers loopback interface. For example; R1’s Loopback0 interface will be in Area 1, R2’s Loopback0 interface will belong in Area 2, etc… On R5 and R6 you will configure area 45 for the FastEthernet network connected to SW1. This configuration will be used for a later lab in the OSPF section.
Review the following command(s);
| Command | Description |
|---|---|
| network ip.ip.ip.ip wc.wc.wc.wc area # | This command is executed in OSPF router configuration mode to specify which interfaces participate in the OSPF process and which OSPF area they belong to. |
| show ip ospf interface | This command is executed in privileged mode to display interface parameters including which Area particular interfaces belong to. |
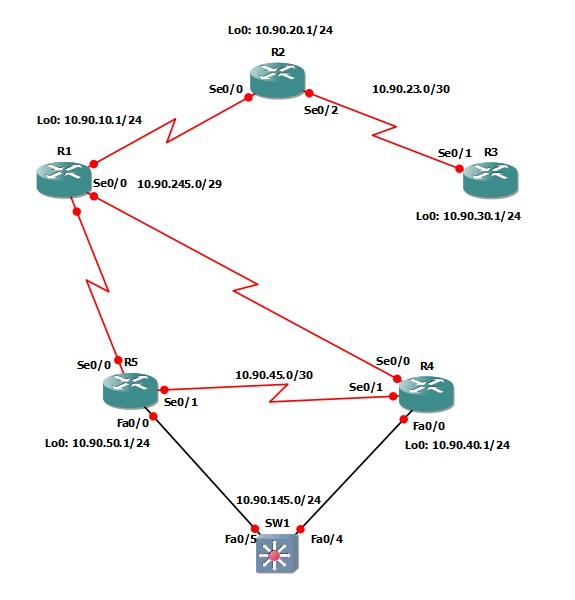
The following logical topology shown below is used in labs found through out Section 9 – Configuring OSPF;
Lab Prerequisites
- If you are using GNS3 than load the Free CCNA Workbook GNS3 topology than start devices; R1, R2, R3, R4, R5 and SW1.
- Establish a console session with devices R1, R2, R3, R4, R5 and SW1 than load the initial configurations provided below by copying the config from the textbox and pasting it into the respected routers console.
Lab Objectives
- Configure R2’s point-to-point link between R2 and R3 in Area 3.
- Configure each routers Loopback0 interface in its own OSPF area, use the router number as the new OSPF area.
- Configure the point-to-point link between R4 and R5 as well as R4 and R5’s physical LAN interfaces (FastEthernet0/0) in OSPF Area 45.
- Verify that all the new OSPF Inter-Area routes are in R1’s routing table; these are denoted as O*IA routes.
Lab Instruction
Objective 1. – Configure R2’s point-to-point link between R2 and R3 in Area 3.
R2#configure terminal
Enter configuration commands, one per line.  End with CNTL/Z.
R2(config)#router ospf 1
R2(config-router)#network 10.90.23.1 0.0.0.0 area 3
R2(config-router)#end
R2#
R3#configure terminal
Enter configuration commands, one per line.  End with CNTL/Z.
R3(config)#router ospf 1
R3(config-router)#network 10.90.23.2 0.0.0.0 area 3
R3(config-router)#end
R3#
%OSPF-5-ADJCHG: Process 1, Nbr 10.90.20.1 on Serial0/1 from LOADING to FULL, Loading Done
R3#
Objective 2. – Configure each routers Loopback0 interface in its own OSPF area, use the router number as the new OSPF area.
R1#configure terminal
Enter configuration commands, one per line.  End with CNTL/Z.
R1(config)#router ospf 1
R1(config-router)#network 10.90.10.1 0.0.0.0 area 1
R1(config-router)#end
R1#
R2#configure terminal
Enter configuration commands, one per line.  End with CNTL/Z.
R2(config)#router ospf 1
R2(config-router)#network 10.90.20.1 0.0.0.0 area 2
R2(config-router)#end
R2#
R3#configure terminal
Enter configuration commands, one per line.  End with CNTL/Z.
R3(config)#router ospf 1
R3(config-router)#network 10.90.30.1 0.0.0.0 area 3
R3(config-router)#end
R3#
R4#configure terminal
Enter configuration commands, one per line.  End with CNTL/Z.
R4(config)#router ospf 1
R4(config-router)#network 10.90.40.1 0.0.0.0 area 4
R4(config-router)#end
R4#
R5#configure terminal
Enter configuration commands, one per line.  End with CNTL/Z.
R5(config)#router ospf 1
R5(config-router)#network 10.90.50.1 0.0.0.0 area 5
R5(config-router)#end
R5#
Objective 3. – Configure the point-to-point link between R4 and R5 as well as R4 and R5’s physical LAN interfaces (FastEthernet0/0) in OSPF Area 45.
R4#configure terminal
Enter configuration commands, one per line.  End with CNTL/Z.
R4(config)#router ospf 1
R4(config-router)#network 10.90.45.1 0.0.0.0 area 45
R4(config-router)#network 10.90.145.1 0.0.0.0 area 45
R4(config-router)#end
R4#
R5#configure terminal
Enter configuration commands, one per line.  End with CNTL/Z.
R5(config)#router ospf 1
R5(config-router)#network 10.90.45.2 0.0.0.0 area 45
%OSPF-5-ADJCHG: Process 1, Nbr 10.90.40.1 on Serial0/1 from LOADING to FULL, Loading Done
R5(config-router)#network 10.90.145.2 0.0.0.0 area 45
R5(config-router)#end
R5#
Objective 4. – Verify that all the new OSPF Inter-Area routes are in R1’s routing table; these are denoted as O*IA routes.
R1#show ip route
Codes: C - connected, S - static, R - RIP, M - mobile, B - BGP
       D - EIGRP, EX - EIGRP external, O - OSPF, IA - OSPF inter area
       N1 - OSPF NSSA external type 1, N2 - OSPF NSSA external type 2
       E1 - OSPF external type 1, E2 - OSPF external type 2
       * - candidate default, U - per-user static route
       o - ODR, P - periodic downloaded static route

Gateway of last resort is not set

     10.0.0.0/8 is variably subnetted, 9 subnets, 4 masks
O IA    10.90.50.1/32 [110/65] via 10.90.245.5, 00:15:38, Serial0/0
O IA    10.90.40.1/32 [110/65] via 10.90.245.4, 00:15:58, Serial0/0
O IA    10.90.23.0/30 [110/128] via 10.90.245.2, 00:18:13, Serial0/0
O IA    10.90.30.1/32 [110/129] via 10.90.245.2, 00:16:13, Serial0/0
O IA    10.90.145.0/24 [110/65] via 10.90.245.5, 00:07:14, Serial0/0
                     [110/65] via 10.90.245.4, 00:08:31, Serial0/0
O IA    10.90.45.0/30 [110/128] via 10.90.245.5, 00:07:24, Serial0/0
                     [110/128] via 10.90.245.4, 00:08:41, Serial0/0
O IA    10.90.20.1/32 [110/65] via 10.90.245.2, 00:17:02, Serial0/0
C       10.90.10.0/24 is directly connected, Loopback0
C       10.90.245.0/29 is directly connected, Serial0/0
R1#
