Configuring Per Interface OSPF
There are two ways to configure OSPF on a single interface, the network command in the routing process config mode or through the ip ospf command in interface configuration. This lab will discuss and demonstrate the configuration and verification of per-interface OSPF configuration.
Real World Application & Core Knowledge
Well you should know by now how to specify which interfaces to participate in a routing protocol as discussed in Lab’s 9-1, 8-1 and 7-1. You use the network statement followed by the network ip address and wildcard mask. However in this lab you will learn a new way to configure an interface to participate in specific OSPF process.
The way discussed in this lab is the new way of configuring OSPF to operate on interfaces; by using this method this prevents unintended interfaces when brought online to participate in OSPF by a broad network statement in the OSPF router configuration. For example, 10.0.0.0 0.255.255.255 would cover any interface in the 10.0.0.0/8 network and if a new interface is brought online with the IP address of 10.89.22.1/24 then it will automatically fall into the configured network statement range. This may cause you unintended problems if you did not plan for this to occur.
By specifying on an interface level rather or not that interface participates in the OSPF routing process, this ensures any new interfaces brought online would not automatically be included in the routing process. Also when configuring OSPFv3 for IP Version 6 (IPv6), you no longer have the network statement but rather you use interface configuration mode only to specify which interfaces participate in the OSPF routing process.
To configure an interface to participate in a specific OSPF routing process you’ll use the ip ospf procid# area # command in interface configuration mode.
Familiarize yourself with the following new command(s);
| Command | Description |
|---|---|
| ip ospf procid# area # | This command is executed in interface configuration mode as an alternative to specify the configured interface to participate in the OSPF routing process via a network statement in OSPF router configuration mode. |
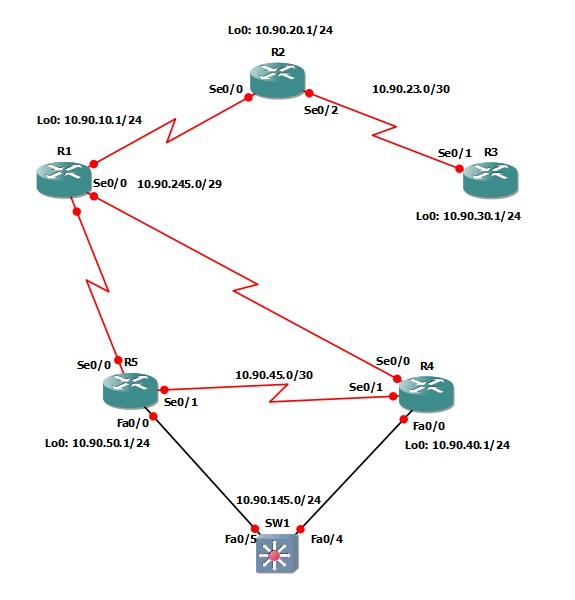
The following logical topology shown below is used in labs found through out Section 9 – Configuring OSPF;
Lab Prerequisites
- If you are using GNS3 than load the Free CCNA Workbook GNS3 topology than start devices; R1, R2, R3, R4, R5 and SW1.
- Establish a console session with devices R1, R2, R3, R4, R5 and SW1 than load the initial configurations provided below by copying the config from the textbox and pasting it into the respected routers console.
Lab Objectives
- Configure each interface on all routers in the OSPF topology to use per-interface OSPF statements and not network statements in the OSPF configuration mode. Complete this in a way that the OSPF neighbor relationships are not dropped.
- Verify that all interfaces on R1 are participating in the OSPF routing process.
Lab Instruction
Objective 1. – Configure each interface on all routers in the OSPF topology to use per-interface OSPF statements and not network statements in the OSPF configuration mode. Complete this in a way that the OSPF neighbor relationships are not dropped.
To complete this objective in a way that the neighbor relationships are NOT dropped when removing the network statements in OSPF router configuration mode you must first configure each interface to participate in the correct OSPF routing process and area then remove the network statements from the OSPF configuration as shown below;
R1#configure terminal
Enter configuration commands, one per line.  End with CNTL/Z.
R1(config)#interface Serial0/0
R1(config-if)#ip ospf 1 area 0
R1(config-if)#interface lo0
R1(config-if)#ip ospf 1 area 1
R1(config-if)#exit
R1(config)#router ospf 1
R1(config-router)#no network 10.90.245.1 0.0.0.0 area 0
R1(config-router)#no network 10.90.10.1 0.0.0.0 area 1
R1(config-router)#end
R1#
%SYS-5-CONFIG_I: Configured from console by console
R1#
R2#configure terminal
Enter configuration commands, one per line.  End with CNTL/Z.
R2(config)#interface Serial0/0
R2(config-if)#ip ospf 1 area 0
R2(config-if)#interface lo0
R2(config-if)#ip ospf 1 area 2
R2(config-if)#interface Serial0/2
R2(config-if)#ip ospf 1 area 3
R2(config-if)#exit
R2(config)#router ospf 1
R2(config-router)#no network 10.90.245.2 0.0.0.0 area 0
R2(config-router)#no network 10.90.20.1 0.0.0.0 area 2
R2(config-router)#no network 10.90.23.1 0.0.0.0 area 3
R2(config-router)#end
R2#
%SYS-5-CONFIG_I: Configured from console by console
R2#
R3#configure terminal
Enter configuration commands, one per line.  End with CNTL/Z.
R3(config)#interface Serial0/1
R3(config-if)#ip ospf 1 area 3
R3(config-if)#interface lo0
R3(config-if)#ip ospf 1 area 3
R3(config-if)#exit
R3(config)#router ospf 1
R3(config-router)#no network 10.90.23.2 0.0.0.0 area 3
R3(config-router)#no network 10.90.30.1 0.0.0.0 area 3
R3(config-router)#end
R3#
%SYS-5-CONFIG_I: Configured from console by console
R3#
R4#configure terminal
Enter configuration commands, one per line.  End with CNTL/Z.
R4(config)#interface Serial0/0
R4(config-if)#ip ospf 1 area 0
R4(config-if)#interface lo0
R4(config-if)#ip ospf 1 area 4
R4(config-if)#interface Serial0/1
R4(config-if)#ip ospf 1 area 45
R4(config-if)#interface FastEthernet0/0
R4(config-if)#ip ospf 1 area 45
R4(config-if)#exit
R4(config)#router ospf 1
R4(config-router)#no network 10.90.245.4 0.0.0.0 area 0
R4(config-router)#no network 10.90.40.1 0.0.0.0 area 4
R4(config-router)#no network 10.90.145.1 0.0.0.0 area 45
R4(config-router)#no network 10.90.45.1 0.0.0.0 area 45
R4(config-router)#end
R4#
*Jul  9 22:03:43.149: %SYS-5-CONFIG_I: Configured from console by console
R4#
R5#configure terminal
Enter configuration commands, one per line.  End with CNTL/Z.
R5(config)#interface Serial0/0
R5(config-if)#ip ospf 1 area 0
R5(config-if)#interface Lo0
R5(config-if)#ip ospf 1 area 5
R5(config-if)#interface Serial0/1
R5(config-if)#ip ospf 1 area 45
R5(config-if)#interface FastEthernet0/0
R5(config-if)#ip ospf 1 area 45
R5(config-if)#exit
R5(config)#router ospf 1
R5(config-router)#no network 10.90.245.5 0.0.0.0 area 0
R5(config-router)#no network 10.90.50.1 0.0.0.0 area 5
R5(config-router)#no network 10.90.45.2 0.0.0.0 area 45
R5(config-router)#no network 10.90.145.2 0.0.0.0 area 45
R5(config-router)#end
R5#
%SYS-5-CONFIG_I: Configured from console by console
R5#
Objective 2. – Verify that all interfaces on R1 are participating in the OSPF routing process.
R1#show ip ospf interface brief
Interface    PID   Area            IP Address/Mask    Cost  State Nbrs F/C
Se0/0        1     0               10.90.245.1/29     64    DR    3/3
Lo0          1     1               10.90.10.1/24      1     LOOP  0/0
R1#
