CCNA Routing & Switching Challenge Lab 1
Are you ready to challenge your CCNA skills? This Challenge Lab is designed to test you on configuration and verification of common CCNA technologies including Layer 2 Switching, Routing, IP Services and more! Be sure to reserve your spot on the Stub Lab to attempt this Challenge Lab.
- Lab Summary
- Initial Configs
- Lab Topologies
- Troubleshooting Section
- Configuration Section
What is a Challenge Lab?
Challenge Labs are like miniature CCIE labs in the sense that they’re designed to test your skills on CCNA topics such as basic configuration of routers and switching including switching, dynamic routing, ip services and more.
Each challenge lab is broken into two separate sections; a troubleshooting section and a configuration section.
In the troubleshooting section you will be presented with 5 (five) troubleshooting tickets that you must resolve before attempting the configuration section. Each troubleshooting ticket is worth 4 points and you should not spend more than 30 minutes on the troubleshooting section in order to ensure that you have enough time to complete the configuration section and verify your work. Problems presented in the troubleshooting tickets will have no affect on your ability to complete the configuration portion of the challenge lab.
The configuration section of the lab is broken into multiple sub-sections whereas each sub-section is designed to be completed in order and may depend on the correct configuration of the previous sub-section to function properly. For example, you need to have RIP working before you can configure offset lists. Each sub-section has variable amount of points you can obtain if completed correctly.
How are the Challenge Labs Graded?
The total amount of points on the challenge lab you can obtain is 100 points whereas 80 points or more is required for a passing score. The labs are not graded however you can discuss the lab answers on the Forums with other community members. Free CCNA Workbook does offer a grading service so if you want to have your challenge lab graded you can save your configurations and submit them to us and we’ll grade them for $25.00 USD and provide you with a summary of which areas you should study in.
Understanding Network Topologies
Unfortunately the CCNA blueprint does not teach you beyond the basics of how to read a network diagram. The CCNA teaches you what diagram icons are used for routers, switches, access points and more however it does not go into depth with how they can be presented in a logical diagram.
In order to become a good network engineer you must be able to understand, read and create network diagrams and topologies. Sadly this skill not typically taught but is more commonly learned through real world experience because no two networks are the same which makes all network diagrams different based on business requirements. Network diagrams can become extremely complex based on the technology being presented such as MPLS, VPN, QoS and other advanced technologies. Thankfully most network diagrams have several items in common such as representation of routers, switches and network segments. First lets look at one of the most confusing things on a network diagram which is how a network segment is represented.

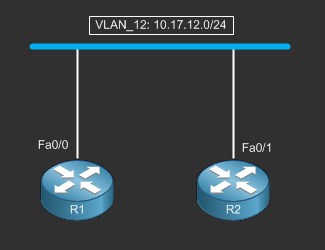
The image above shows two routers and you see them connected to this blue line. This blue line represents a network segment or VLAN. In this case it represents VLAN_12 which has the layer 3 subnet of 10.17.12.0/24. R1 is connected to this network segment via FastEthernet0/0 and R2 is connected to the network segment via FastEthernet0/1. The most confusing part of this diagram is the switch. Where is the switch?
Well the network segment only represents a layer 2 network so in this case there could be multiple switches that participate in this network segment. In the physical diagram which can be found on the topology page, R1 Fa0/0 is connected to SW1 Fa0/1 and R2 Fa0/1 is connected to SW2 Fa0/2. So in order for R1 to Reach R2 through this network segment, SW1 and SW2 must be connected using a trunk interface so the logical network segment is shared among two switches. In most network documentation you will see VLAN’s or network segments represented like this because its impossible to draw out actual physical connectivity on large diagrams. If you were to attempt to draw out this diagram with all devices you would have an extremely hard to read network diagram.
If you want to see other network diagrams examples you can visit Google and search for network diagram in the “images” section and you will be presented with tons of diagrams to look at as examples. Keep in mind there is a difference between physical diagrams and logical diagrams. Physical diagrams will show actual physical connectivity of interfaces whereas logical diagrams may show the intended network diagram through means of VLAN technologies, VPN’s, MPLS and more.
Getting Started
To attempt this challenge lab you will first need reserve a lab session on the Stub Lab. Each lab session is a 3 hour lab and when your lab session starts you will need to establish connectivity to all network devices listed in the network diagram. For the CCNA Challenge Lab 1; you will not need to establish connectivity with FW1, FW2 and SW4 as these devices are NOT used in this lab.
Once you have a terminal window open for each device, power them all on and wait till they have completed booting. You may need to erase the existing configuration on the devices, in which case you will use the write erase command in privileged mode and reload the device without saving the configuration. Once you have an reset each lab device back to factory configuration defaults you will need to copy and paste in the initial configurations provided in this lab on each lab device which will also reload the devices again.
Please note that you will be required to power on the backbone routers and apply the initial configurations to them as well.
The default password used on all lab devices is “cisco” without quotations.
Once you have loaded the configs you should familiarize yourself with the lab logical topology diagrams. Once you feel that you understand the diagrams you can continue on to the troubleshooting section to resolve the troubleshooting tickets then on towards the configuration portion of the lab.
Be sure to save your final configurations on your own computer using “show run” and copying the config from each device into notepad. If you want Free CCNA Workbook to grade your configs you will need to submit your configs to support at freeccnaworkbook.com along with $25.00 USD via Paypal using the “donate” button which can be found on the Donations Page
I Need Help
If you are stuck on a particular section or objective you can post your question(s) on the Free CCNA Workbook Facebook page! Please do not email support asking for the answers as we will not provide them.
To visit the official Facebook page of Free CCNA Workbook click the button below!
Initial Configs
Before starting the Challenge Lab you must load the following initial configurations into their respective devices.
Backbone Router Device Initial Configs
The challenge lab makes use of backbone routers to inject routes into the network for simulation of OSPF, EIGRP, RIP adjacencies.
You must load these configurations into the backbone routers however during the lab you should not access to these devices.
Stub Lab Physical Topology
The physical of the challenge lab is based on the physical topology of the Stub Lab which is used in every lab published on the Free CCNA Workbook website. To view the physical topology visit the topology page or click the button below to open the page in a new tab.
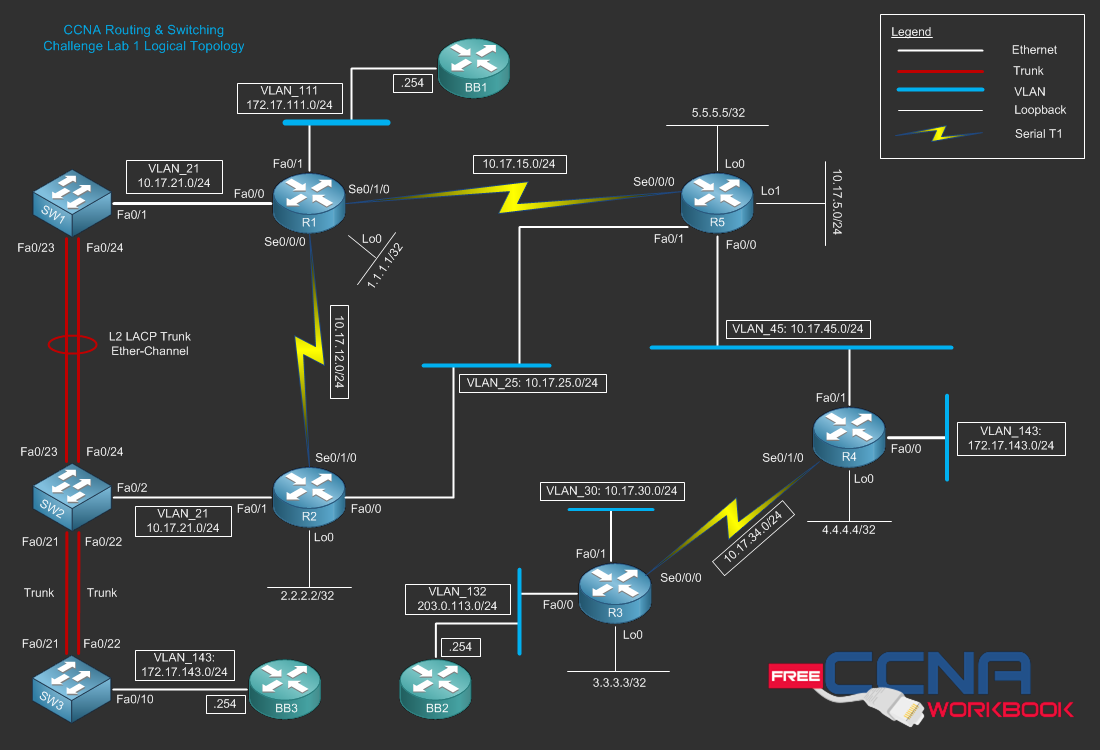
Logical Topology

Switching Topology

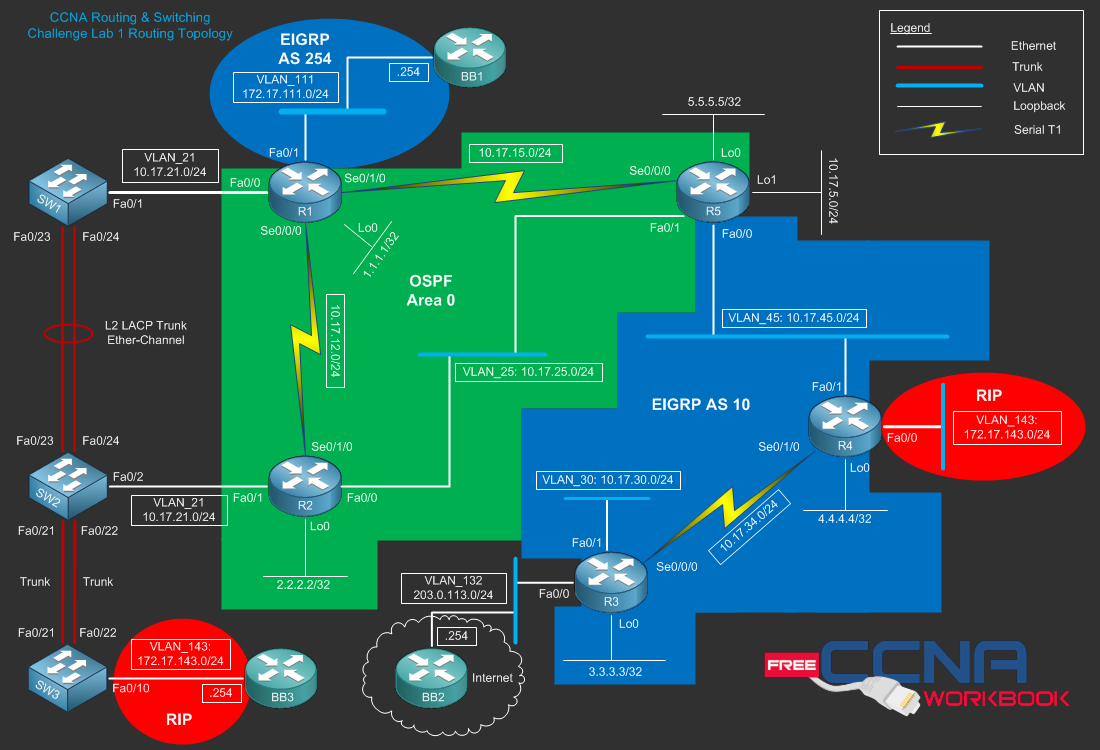
Routing Topology

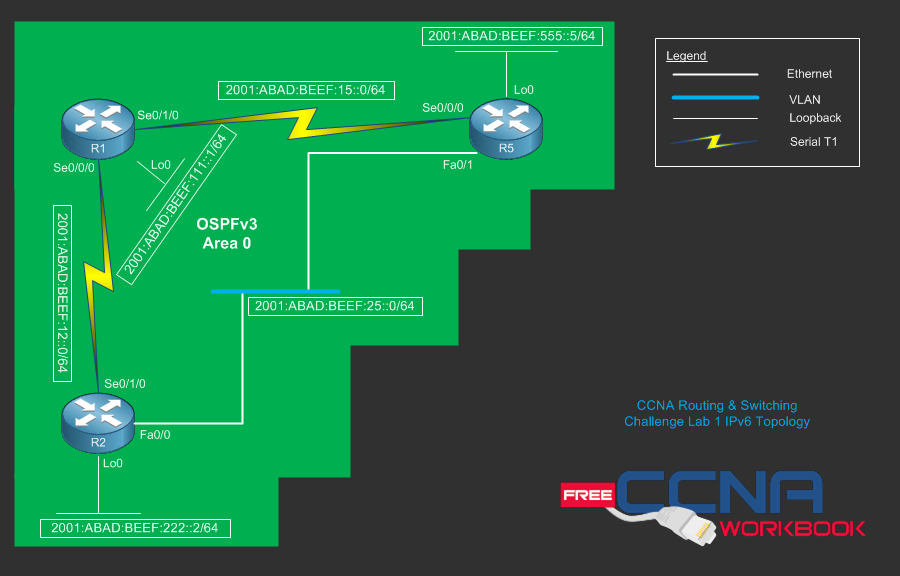
IPv6 Topology

Instructions
Five problems have been injected into the initial configurations. You must resolve the following five help desk tickets. The problems presented in the troubleshooting section can prevent you from completing the configuration section. As a good frame of reference, you should not spend more than 30 minutes on the troubleshooting section to allow yourself enough time to complete the configuration section.
Ticket 1 – NTP (4 Points)
R1 has been setup as an NTP Server with the correct date and time. R2 has been configured as an NTP Client of R1 and it should sync its date and time via NTP with R1 however R2 is unable to associate with the NTP Server. Correct the problem so that R2 synchronizes its time with R1 via NTP. You cannot remove any ACL entries to resolve this problem.
Ticket 2 – Password Reset (4 Points)
You have forgotten the enable password to R5, you must perform a password reset procedure on R5 without losing any of the configuration previously stored in NVRAM.
Ticket 3 – IP Addressing (4 Points)
R4’s Fa0/0 interface is unable to ping BB3 Fa0/0 interface. You cannot change the configuration on any of the switches to resolve this issue.
Ticket 4 – OSPF (4 Points)
The Serial Link between R3 and R4 has been pre-configured to participate in OSPF Area 0 however these routers are unable to establish an OSPF adjacency. Fix the problem so that R3’s loopback0 interface can pint R4’s Loopback0 interface.
Ticket 5 – PPP Authentication (4 Points)
The T1 Serial Link between R1 and R5 has PPP authentication configured on it however both R1 and R5 show the line protocol as down. Resolve the issue without removing PPP and verify your solution by pinging R5’s Serial0/0/0 interface from R1’s Serial0/1/0 interface.
Switching (Layer 2) – 20 Points Total
Ether-Channel – (2 points)
- Configure an LACP Ether-Channel between SW1 and SW2 on interface(s) FastEthernet0/23 and FastEthernet0/24 using the port channel number 12
- Configure SW1 so that LACP is enabled unconditionally and SW2 should only enable LACP if an LACP device is detected.
Trunking – (2 points)
- Configure Port-Channel12 on both SW1 and SW2 as a static 802.1q trunk
- Configure SW2’s FastEthernet0/21 and FastEthernet0/22 interfaces as 802.1q trunks
- Configure SW3’s FastEthernet0/21 and FastEthernet0/22 interfaces as 802.1q trunks
- Configure interface FastEthernet0/21 on SW2 and SW3 to only permit VLAN 143
VTP (VLAN Trunking Protocol) – (2 points)
- Configure SW2 as the VTP Server running version 2 using the domain “STUBLAB” and the password “CCNA”
- Configure SW1 and SW3 as VTP Clients of SW2.
VLAN Mangement – (5 points)
- Configure all VLAN’s in the diagram on SW2 and ensure that they are propagated correct to the client switches.
- Configure all switchport(s) connected to routers on SW1 and SW2 as access ports in the correct VLAN’s.
Port Security – (4 points)
- Configure Port Security on SW1’s FastEthernet0/1 whereas the maximum MAC addresses is limited to 3
- Set the port security violate to shutdown the interface.
- Configure SW1 to automatically recover any port-security violation automatically every 5 minutes.
Spanning Tree Protocol – (5 points)
- Configure Rapid Per-VLAN Spanning Tree on all switches.
- Configure SW2 as the ROOT bridge for all VLAN’s except VLAN_143 using the priority 4096
- On SW2 enable PortFast and BPDU Guard on every interface by default.
- Configure SW3 as the ROOT bridge for VLAN_143 using the priority 8192
Routing (Layer 3) – 30 Points Total
IP Addressing – (3 points)
- Configure all IP Addressing as depicted in the logical diagram whereas the last octet is the device number.
- Configure interface VLAN21 on SW1 with the IP address of 10.17.21.11/24
- Configure interface VLAN25 on SW2 with the IP address of 10.17.25.12/24
- Configure interface VLAN30 on SW3 with the IP address of 10.17.30.13/24
Static Routing & Default Gateways – (3 points)
- Configure a static route with the administrative distance of 250 on R4 pointing towards BB3 to reach the 192.168.20.0/24 network.
- Configure a default route for internet access on R3 pointing towards 203.0.113.254 and verify you can ping 4.2.2.2
- Configure R1’s FastEthernet0/0 interface as SW1’s default gateway.
- Configure R2’s FastEthernet0/0 interface as SW2’s default gateway.
- Configure R3’s FastEthernet0/1 interface as SW3’s default gateway.
RIP – (4 points)
- Configure RIPv2 on R4’s FastEthernet0/0 interface and verify that 33.33.33.33/32 is being learned via BB3.
- Configure RIP on R4 so that it does not summarize classful boundaries.
- Configure an offset list so that the network 33.33.33.33 is shown as 5 hops away on R4.
EIGRP – (5 points)
- Configure EIGRP AS 254 on R1’s FastEthernet0/1 interface and verify that 11.11.11.11/32 is being learned via BB1.
- Configure EIGRP AS 10 on all router interfaces depicted in the routing topology.
- Loopback0 interfaces of R3 and R4 must be advertised into EIGRP AS 10.
- Verify that SW3 can ping 4.4.4.4
OSPF – (6 points)
- Configure OSPF on R1, R2 and R5 using process ID 1 and place all interfaces depicted in the routing diagram into area 0.
- Configure R2’s FastEthernet0/0 to ensure that it becomes the DR on the VLAN_25 LAN Segment.
- Statically configure the router id’s on each device using the loopback0 IP address if the respective device.
- Verify that SW1 can ping R5’s loopback0 interface.
- Configure R5 to advertise a default route via OSPF only if a default route exist in R5’s routing table.
Route Redistribution – (5 points)
- Configure mutual redistribution on R1 between OSPF Area 0 and EIGRP AS 254
- Configure mutual redistribution on R5 between OSPF Area 0 and EIGRP AS 10
- Redistribute the connected interface(s) into OSPF Area 0 on R5 using the metric 512000
- Configure mutual redistribution on R4 between EIGRP AS 10 and RIP
- Redistribute the static default route on R3 into EIGRP AS 10 and verify that SW1 can ping 4.2.2.2
Route Engineering – (4 points)
- Configure R2 so that traffic destined towards R5’s Loopback0 interface traverses the Serial0/1/0 interface.
- Configure R1 to summarize the multiple 172.17.X.X/24 networks learned via BB1 into OSPF Area 0 as a /22
- Verify that the OSPF Summary originated by R1 is in R3’s routing table.
IPv6 (IP Version 6) – 8 Points Total
IPv6 Addressing – (2 points)
- Enable IPv6 Unicast Routing on R1, R2 and R5.
- Configure all IPv6 Addresses on R1, R2 and R5 depicted on the IPv6 Topology.
- Verify IPv6 connectivity via PING.
IPv6 Static Routing – (2 points)
- Configure an IPv6 static route on R2 with the administrative distance of 64 so that traffic destined to R5 Lo0 is routed towards 2001:abad:beef:25::5
- Configure an IPv6 static route on R5 with the administrative distance of 64 so that traffic destined to R2 Lo0 is routed towards 2001:abad:beef:25::2
- Verify that R2’s Loopback0 interface can reach R5’s Loopback0 interface via the static route using traceroute.
IPv6 OSPF (OSPFv3) – (4 points)
- Configure OSPFv3 process 125 on R1, R2 and R5 using the IPv4 addresses of the loopback0 interface.
- Configure all interfaces depicted on the IPv6 topology to participate in OSPFv3 Area 0
- Verify the IPv6 routing table and that R1’s Loopback0 can reach the loopback0 interfaces of R2 and R5
IP Services – 12 Points Total
DHCP Services – (4 points)
- Configure a DHCP Pool named VLAN_21 on R1 with using the domain name STUBLAB.LOCAL
- Configure 10.17.21.0/24 as network scope for the DHCP Pool named VLAN_21
- Configure the DHCP Pool VLAN_21 to use 172.17.21.1 as the default gateway
- Configure the DHCP Pool VLAN_21 to use 8.8.8.8 and 8.8.4.4 as the DNS Servers
NAT Overload – (4 points)
- Configure R3 to NAT all traffic sourced from 10.17.0.0/16 networks to the FastEthernet0/0 interface.
- Ping 4.2.2.2 from SW1 and verify that 10.17.21.11 is being overloaded to 203.0.113.3/24
Static PAT (Port Address Translation) – (4 points)
- Configure a static port address translation on R3 so that any traffic destined to 203.0.113.3/24 on port 8080 is translated to 4.4.4.4:80
- Verify this configuration by using telnet on BB2 to 203.0.113.3; once connected type “GET” If successful you will receive the IOS HTTP Server bad request.
Security – 8 Points Total
Secure Shell (SSH) – (2 points)
- Configure R1 so that it will only accept SSH management sessions
- Use the domain name STUBLAB.LOCAL to generate the general use crypto key
- Create a user named “tom” with level 15 privileges and a password of “cisco”
Access Control Lists – (3 points)
- On R3 configure an ingress extended named “GO_AWAY” on FastEthernet0/0 that denies any traffic sourced by host 198.51.100.213/32
- On R1 configure a standard numbered ACL to permit only traffic from 10.17.21.0/24 and assign it to the VTY Lines.
Local Logging – (3 points)
- Disable console logging on R5.
- Configure R5 so that any severity5 event or greater is logged locally in a buffer with the size of 131072
