OSPF for IPv6 – OSPFv3
OSPF is very common among IPv4 networks and also has a newer version known as OSPFv3 to work with IPv6. This lab will discuss and demonstrate the configuration and verification of OSPF version 3.
Real World Application & Core Knowledge
In the real world many companies use multiple vendors when it comes to networking equipment such as Cisco, Juniper, Adtran and others and with multi-vendor solution requires a multi-vendor supported routing protocol. OSPFv3 (Open Shortest Path First version 3) is sets the industry standard as an interior dynamic gateway routing protocol. Since OSPF is an industry standard it is supported on nearly every routing platform from any vendor.
OSPF has since been ported from IPv4 to IPv6 with OSPFv3. Most of the concepts and rules remain the same including stub areas, backbone area, default information-originate and more. If you need to review OSPF take a look back at the CCNA Workbook Section 9.
However there are a few changes as to configuring OSPFv3 vs OSPF for IPv4. Instead of using the network x.x.x.x wc.wc.wc.wc area # command in ospf router configuration mode you now configure OSPFv3 on a per interface basis using the ipv6 ospf procid# area area# command in interface configuration mode.
There are many reasons as to why you’d need to get into OSPFv3 router configuration mode such as configuring the router-id or setting the default information or distribute list. In which case you’ll use the ipv6 router ospf procid# command in global configuration mode. However keep in mind the network command does not exist in OSPFv3.
Also if you think back to OSPF for IPv4 you’ll remember that the OSPF Router-ID is determined by the highest IPv4 address on a loopback or physical interface if it is not statically configured. When working with a strictly IPv6 network, you’ll need to statically set an OSPFv3 Router-ID by using the router-id x.x.x.x command in IPv6 ospf router configuration mode.
Many of the verification commands for OSPF have also been ported to IPv6 such as the show ipv6 ospf neighbor, show ipv6 ospf interface and show ipv6 ospf database commands.
To view important OSPFv3 information such as the current timers, router-id, reference bandwidth you’ll need to use the show ipv6 ospf procid# command in user or privileged mode.
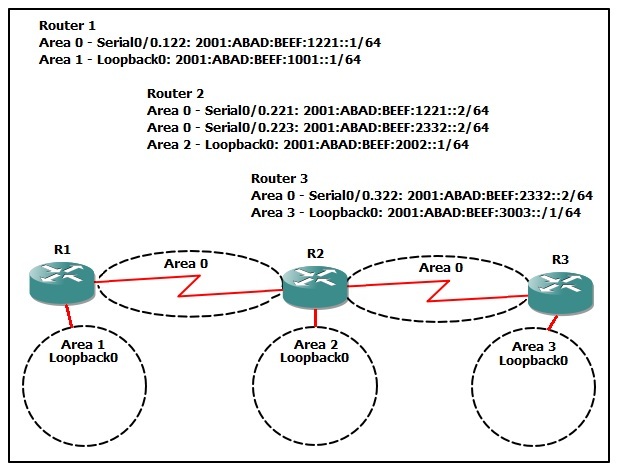
In this lab you will configure OSPFv3 Area 0 on the frame relay sub-interfaces between R1 & R2 and R2 to R3 and Area’s 1, 2 and 3 on the loopback interfaces of each router. Upon completion you should be able to route IPv6 traffic between the simulated IPv6 networks located on the loopback0 interface of each router.
Familiarize yourself with the following new command(s);
| Command | Description |
|---|---|
| ipv6 ospf procid# area areaid# | This command when executed in interface configuration mode enables OSPFv3 per specified process id and area id. |
| ipv6 router ospf procid# | This command when executed in global configuration mode places you into IPv6 OSPF (OSPFv3) router configuration mode where you can configure the router-id, distribute list, default information options and more. |
| router-id x.x.x.x | This command is executed in OSPFv3 router configuration mode to statically set a router-id. If you’re in a complete IPv6 network with no IPv4 addresses assigned to any interface on a router you must have a Router-ID assigned due to OSPF not being able to use the highest IPv4 address assigned to a logical or connected physical interface. |
| show ipv6 ospf procid# | This command when executed in user or privileged mode will display current timers, router-id and reference bandwidth. |
| show ipv6 ospf neighbor | This command when executed in user or privileged mode displays established neighbor relationships and their router type (DR,BDR, DROTHER) |
| show ipv6 ospf database | This command when executed in user or privileged mode displays the current OSPFv3 database contents including the sequence number. |
The following logical topology will be used for this lab;
Lab Prerequisites
- If you are using GNS3 than load the Free CCNA Workbook GNS3 topology than start device(s); R1, R2 and R3
- Establish a console session with device(s) R1, R2 and R3 than load the initial configurations provided below by copying the config from the textbox and pasting it into the respected routers console.
Lab Objectives
- Configure R1, R2 and R3’s OSPFv3 Router-ID according to their router number. I.e; 1.1.1.1
- Configure R1’s Serial0/0.122 & R2’s Serial0/0.221 interfaces to participate in OSPF Area 0.
- Configure R2’s Serial0/0.223 & R3’s Serial0/0.322 interfaces to participate in OSPF Area 0.
- Configure R1’s Loopback0 interface to participate in OSPF Area 1 and ensure that R1 advertises Lo0 as a /64 subnet and not a host route (/128).
- Configure R2’s Loopback0 interface to participate in OSPF Area 2 and ensure that R1 advertises Lo0 as a /64 subnet and not a host route (/128).
- Configure R2’s Loopback0 interface to participate in OSPF Area 3 and ensure that R1 advertises Lo0 as a /64 subnet and not a host route (/128).
- Verify that R1’s Loopback0 network is in the IPv6 routing table of R3.
- Verify that R3’s Loopback0 network has IPv6 connectivity to R1’s Loopback0 network using PING.
Lab Instruction
Objective 1. – Configure R1, R2 and R3’s OSPFv3 Router-ID according to their router number. I.e; 1.1.1.1
R1>enable
R1#configure terminal
Enter configuration commands, one per line.  End with CNTL/Z.
R1(config)#ipv6 unicast-routing
R1(config)#ipv6 router ospf 1
R1(config-rtr)#router-id 1.1.1.1
R1(config-rtr)#exit
R1(config)#
R2>enable
R2#configure terminal
Enter configuration commands, one per line.  End with CNTL/Z.
R2(config)#ipv6 unicast-routing
R2(config)#ipv6 router ospf 1
R2(config-rtr)#router-id 2.2.2.2
R2(config-rtr)#exit
R2(config)#
R3>enable
R3#configure terminal
Enter configuration commands, one per line.  End with CNTL/Z.
R3(config)#ipv6 unicast-routing
R3(config)#ipv6 router ospf 1
R3(config-rtr)#router-id 3.3.3.3
R3(config-rtr)#exit
R3(config)#
Objective 2. – Configure R1’s Serial0/0.122 & R2’s Serial0/0.221 interfaces to participate in OSPF Area 0.
R1(config)#interface Serial0/0.122
R1(config-subif)#ipv6 ospf 1 area 0
R1(config-subif)#exit
R1(config)#
R2(config)#interface s1/0.221
R2(config-subif)#ipv6 ospf 1 area 0
R2(config-subif)#
%OSPFv3-5-ADJCHG: Process 1, Nbr 1.1.1.1 on Serial0/0.221 from LOADING
to FULL, Loading Done
R2(config-subif)#exit
R2(config)#
Objective 3. – Configure R2’s Serial0/0.223 & R3’s Serial0/0.322 interfaces to participate in OSPF Area 0.
R2(config)#interface Serial0/0.223
R2(config-subif)#ipv6 ospf 1 area 0
R2(config-subif)#exit
R2(config)#
R3(config)#interface Serial0/0.322
R3(config-subif)#ipv6 ospf 1 area 0
R3(config-subif)#exit
R3(config)#
%OSPFv3-5-ADJCHG: Process 1, Nbr 2.2.2.2 on Serial0/0.322 from LOADING
to FULL, Loading Done
R3(config)#
Objective 4. – Configure R1′s Loopback0 interface to participate in OSPF Area 1 and ensure that R1 advertises Lo0 as a /64 subnet and not a host route (/128).
Note: Loopback interfaces have their own OSPF network type in which case OSPF advertises a host route to the loopback interface and not the configure subnet mask. To change OSPF to advertise the subnet assigned to the loopback interface you’ll need to change the network type to point-to-point as shown below;
R1(config)#interface loopback0
R1(config-if)#ipv6 ospf 1 area 1
R1(config-if)#ipv6 ospf network point-to-point
R1(config-if)#end
R1#
%SYS-5-CONFIG_I: Configured from console by console
R1#
Objective 5. – Configure R2′s Loopback0 interface to participate in OSPF Area 2 and ensure that R1 advertises Lo0 as a /64 subnet and not a host route (/128).
R2(config)#interface loopback0
R2(config-if)#ipv6 ospf 1 area 2
R2(config-if)#ipv6 ospf network point-to-point
R2(config-if)#end
R2#
%SYS-5-CONFIG_I: Configured from console by console
R2#
Objective 6. – Configure R3′s Loopback0 interface to participate in OSPF Area 3 and ensure that R1 advertises Lo0 as a /64 subnet and not a host route (/128).
R3(config)#interface loopback0
R3(config-if)#ipv6 ospf 1 area 3
R3(config-if)#ipv6 ospf network point-to-point
R3(config-if)#end
R3#
%SYS-5-CONFIG_I: Configured from console by console
R3#
Objective 7. – Verify that R1’s Loopback0 network is in the IPv6 routing table of R3.
R3#show ipv6 route ospf
IPv6 Routing Table - Default - 8 entries
Codes: C - Connected, L - Local, S - Static, U - Per-user Static route
       B - BGP, M - MIPv6, R - RIP, I1 - ISIS L1
       I2 - ISIS L2, IA - ISIS interarea, IS - ISIS summary, D - EIGRP
       EX - EIGRP external
       O - OSPF Intra, OI - OSPF Inter, OE1 - OSPF ext 1, OE2 - OSPF ext 2
       ON1 - OSPF NSSA ext 1, ON2 - OSPF NSSA ext 2
OI  2001:ABAD:BEEF:1001::/64 [110/129]
     via FE80::C800:DFF:FE0C:8, Serial0/0.322
O   2001:ABAD:BEEF:1221::/64 [110/128]
     via FE80::C800:DFF:FE0C:8, Serial0/0.322
OI  2001:ABAD:BEEF:2002::1/128 [110/64]
     via FE80::C800:DFF:FE0C:8, Serial0/0.322
R3#
Objective 8. – Verify that R3′s Loopback0 network has IPv6 connectivity to R1′s Loopback0 network using PING.
R3#ping 2001:ABAD:BEEF:1001::1 source loopback0

Type escape sequence to abort.
Sending 5, 100-byte ICMP Echos to 2001:ABAD:BEEF:1001::1, timeout
is 2 seconds:
Packet sent with a source address of 2001:ABAD:BEEF:3003::1
!!!!!
Success rate is 100 percent (5/5), round-trip min/avg/max = 8/41/104 ms
R3#
