GRE works by encapsulating IP traffic inside of an IP packet and sends it across the wire to its destination where it is decapsulated and the inner-packet is than routed. GRE is commonly used to bridge two routed domains over a network outside of your administrative control.
When using GRE over the public internet, security is a concern and therefore you would want to encrypt the traffic, this is where IPSEC comes in.
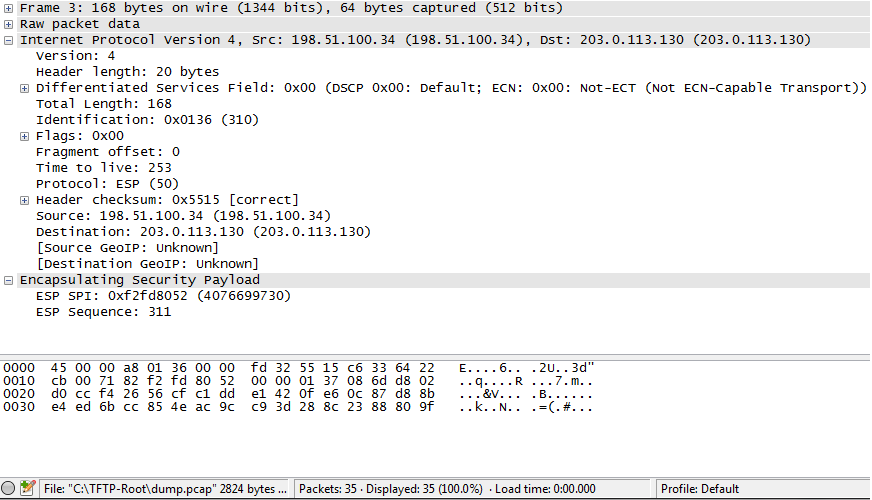
IPSEC GRE tunnels are GRE tunnels that are encapsulated inside of an IPSEC payload and sent across a public network. If you were to capture such traffic using Wireshark you would see only ESP (Encapsulating Security Payload) and not GRE as depicted below;
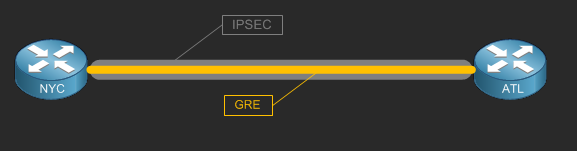
To get a better understanding this concept the following diagram should help;
Okay so how do I configure it?
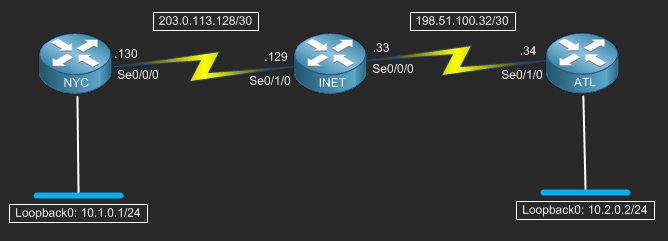
Now on to the fun part, configuration. First off lets take a look at the diagram we’ll be using to demonstrate this technology;
The following configuration demonstration was performed on the Stub Lab. If you like, you can also do this configuration on the Stub Lab which is a freely accessible Cisco Lab. All ya gotta do is sign up and reserve lab time!
First off we need to configure the INET router. This router will simulate the internet connectivity between the NYC and ATL routers. The following initial configuration has been provided to make this quickly achievable;
Now we can go ahead and configure the basics on the NYC and ATL routers. We’ll setup a loopback interface on each router to simulate LAN connectivity and than EIGRP to route over the tunnel.
Router con0 is now available

Press RETURN to get started.


Router>enable
Router#config terminal
Enter configuration commands, one per line.  End with CNTL/Z.
Router(config)#hostname NYC
NYC(config)#no ip domain-lookup
NYC(config)#interface Loopback0
NYC(config-if)#description Simulated LAN Connection
NYC(config-if)#ip add 10.1.0.1 255.255.255.0
NYC(config-if)#exit
NYC(config)#interface Serial0/0/0
NYC(config-if)#description Link to Internet
NYC(config-if)#ip address 203.0.113.130 255.255.255.252
NYC(config-if)#exit
NYC(config)#router eigrp 1
NYC(config-router)#no auto-summary
NYC(config-router)#network 10.1.0.1 0.0.0.0
NYC(config-router)#exit
NYC(config)#ip route 0.0.0.0 0.0.0.0 203.0.113.129
NYC(config)#
Router con0 is now available

Press RETURN to get started.


Router>enable
Router#config terminal
Enter configuration commands, one per line.  End with CNTL/Z.
Router(config)#hostname ATL
ATL(config)#no ip domain-lookup
ATL(config)#interface Loopback0
ATL(config-if)#description Simulated LAN Connection
ATL(config-if)#ip add 10.2.0.2 255.255.255.0
ATL(config-if)#exit
ATL(config)#interface Serial0/1/0
ATL(config-if)#description Link to Internet
ATL(config-if)#ip address 198.51.100.34 255.255.255.252
ATL(config-if)#exit
ATL(config)#router eigrp 1
ATL(config-router)#no auto-summary
ATL(config-router)#network 10.2.0.2 0.0.0.0
ATL(config-router)#exit
ATL(config)#ip route 0.0.0.0 0.0.0.0 198.51.100.33
ATL(config)#
Now that the basic config is out of the way we can now setup the basic GRE tunnel interface and enable EIGRP routing on the tunnel interface which should allow the two simulated LAN segments to communicate with each other unencrypted over the public internet.
NYC(config)#interface Tunnel0
NYC(config-if)#description IPSEC GRE TUNNEL TO ATLANTA
NYC(config-if)#ip address 10.12.0.1 255.255.255.0
NYC(config-if)#tunnel source Serial0/0/0
NYC(config-if)#tunnel destination 198.51.100.34
NYC(config-if)#exit
NYC(config)#router eigrp 1
NYC(config-router)#network 10.12.0.1 0.0.0.0
NYC(config-router)#exit
%DUAL-5-NBRCHANGE: EIGRP-IPv4 1: Neighbor 10.12.0.2 (Tunnel0) is up: new adjacency
NYC(config)#exit
NYC#
%SYS-5-CONFIG_I: Configured from console by console
NYC#
ATL(config)#interface Tunnel0
ATL(config-if)#description IPSEC GRE TUNNEL TO ATLANTA
ATL(config-if)#ip address 10.12.0.2 255.255.255.0
ATL(config-if)#tunnel source Serial0/1/0
ATL(config-if)#tunnel destination 203.0.113.130
ATL(config-if)#exit
ATL(config)#router eigrp 1
ATL(config-router)#network 10.12.0.2 0.0.0.0
ATL(config-router)#exit
%DUAL-5-NBRCHANGE: EIGRP-IPv4 1: Neighbor 10.12.0.1 (Tunnel0) is up: new adjacency
ATL(config)#exit
ATL#
%SYS-5-CONFIG_I: Configured from console by console
ATL#
Now that a basic GRE tunnel has been established, we can verify the operational status of the tunnel by pinging the other end.
NYC#ping 10.12.0.2
Type escape sequence to abort.
Sending 5, 100-byte ICMP Echos to 10.12.0.2, timeout is 2 seconds:
!!!!!
Success rate is 100 percent (5/5), round-trip min/avg/max = 8/8/8 ms
NYC(config)#
Also you should have noticed that the NYC and ATL became EIGRP neighbors and you should now have the ability to ping Atlanta’s simulated LAN segment from New York as demonstrated below;
NYC#ping 10.2.0.2 source loopback0
Type escape sequence to abort.
Sending 5, 100-byte ICMP Echos to 10.2.0.2, timeout is 2 seconds:
Packet sent with a source address of 10.1.0.1
!!!!!
Success rate is 100 percent (5/5), round-trip min/avg/max = 8/8/8 ms
NYC#
Now we’re ready to configure the IPSEC portion of the IPSEC GRE tunnel. First you must define an ISAKMP policy. ISAKMP policies are used to define the phase 1 negotiations of an IPSEC tunnel. When it comes to IPSEC GRE, the ISAKMP policy is very simple. The policy must be defined on both routers.
NYC#config terminal
NYC(config)#crypto isakmp policy 10
NYC(config-isakmp)#authentication pre-share
NYC(config-isakmp)#exit
NYC(config)#
ATL#config terminal
ATL(config)#crypto isakmp policy 10
ATL(config-isakmp)#authentication pre-share
ATL(config-isakmp)#exit
ATL(config)#
Next we need to need to define the pre-shared key on a per peer basis;
NYC(config)#crypto isakmp key 0 CISCO address 198.51.100.34
ATL(config)#crypto isakmp key 0 CISCO address 203.0.113.130
than we need to configure the transform-set which will actually be used to encrypt the data. For this demonstration we’re going to use AES128 and SHA hashing.
NYC(config)#crypto ipsec transform-set TRANS_IPSEC_GRE esp-aes esp-sha-hmac
ATL(config)#crypto ipsec transform-set TRANS_IPSEC_GRE esp-aes esp-sha-hmac
Next we’ll need to build the ipsec profile that will be applied to the GRE tunnel interface;
NYC(config)#crypto ipsec profile IPSEC_GRE
NYC(ipsec-profile)#set transform-set TRANS_IPSEC_GRE
ATL(config)#crypto ipsec profile IPSEC_GRE
ATL(ipsec-profile)#set transform-set TRANS_IPSEC_GRE
Finally once all the IPSEC configuration is completed we can assign the IPSEC profile to the tunnel interface as shown below;
NYC(ipsec-profile)#interface Tunnel0
NYC(config-if)#tunnel protection ipsec profile IPSEC_GRE
NYC(config-if)#
%CRYPTO-6-ISAKMP_ON_OFF: ISAKMP is ON
NYC(config-if)#^Z
NYC#
ATL(ipsec-profile)#interface Tunnel0
ATL(config-if)#tunnel protection ipsec profile IPSEC_GRE
ATL(config-if)#
%CRYPTO-6-ISAKMP_ON_OFF: ISAKMP is ON
ATL(config-if)#^Z
ATL#
And now for the ultimate verification! We’ll ping the Atlanta simulated LAN segment (Loopback0: 10.2.0.2) from the NYC simulated LAN Segment (Loopback0: 10.1.0.1) and verify that the packets are being encrypted and decrypted by viewing the ipsec security-association;
NYC#ping 10.2.0.2 source loopback0
Type escape sequence to abort.
Sending 5, 100-byte ICMP Echos to 10.2.0.2, timeout is 2 seconds:
Packet sent with a source address of 10.1.0.1
!!!!!
Success rate is 100 percent (5/5), round-trip min/avg/max = 8/8/8 ms
NYC#
NYC#show crypto ipsec sa peer 198.51.100.34

interface: Tunnel0
    Crypto map tag: Tunnel0-head-0, local addr 203.0.113.130

   protected vrf: (none)
   local  ident (addr/mask/prot/port): (203.0.113.130/255.255.255.255/47/0)
   remote ident (addr/mask/prot/port): (198.51.100.34/255.255.255.255/47/0)
   current_peer 198.51.100.34 port 500
     PERMIT, flags={origin_is_acl,}
    #pkts encaps: 79, #pkts encrypt: 79, #pkts digest: 79
    #pkts decaps: 79, #pkts decrypt: 79, #pkts verify: 79
    #pkts compressed: 0, #pkts decompressed: 0
    #pkts not compressed: 0, #pkts compr. failed: 0
    #pkts not decompressed: 0, #pkts decompress failed: 0
    #send errors 0, #recv errors 0

     local crypto endpt.: 203.0.113.130, remote crypto endpt.: 198.51.100.34
     path mtu 1500, ip mtu 1500, ip mtu idb Serial0/0/0
     current outbound spi: 0xE15A5BAE(3780795310)
     PFS (Y/N): N, DH group: none

     inbound esp sas:
      spi: 0x67D027CC(1741694924)
        transform: esp-aes esp-sha-hmac ,
        in use settings ={Tunnel, }
        conn id: 2007, flow_id: NETGX:7, sibling_flags 80000046, crypto map: Tunnel0-head-0
        sa timing: remaining key lifetime (k/sec): (4590179/3282)
        IV size: 16 bytes
        replay detection support: Y
        Status: ACTIVE

     inbound ah sas:

     inbound pcp sas:

     outbound esp sas:
      spi: 0xE15A5BAE(3780795310)
        transform: esp-aes esp-sha-hmac ,
        in use settings ={Tunnel, }
        conn id: 2008, flow_id: NETGX:8, sibling_flags 80000046, crypto map: Tunnel0-head-0
        sa timing: remaining key lifetime (k/sec): (4590178/3282)
        IV size: 16 bytes
        replay detection support: Y
        Status: ACTIVE

     outbound ah sas:

     outbound pcp sas:
NYC#
We have successfully build an IPSEC GRE tunnel that can route EIGRP between two locations over the internet securely. Post your comments and questions below!

Recent Comments