Configuring RADIUS and TACACS+ on the Cisco ASA
This lab will discuss and demonstrate the configuration of RADIUS and TACACS+ on the Cisco ASA so that you may authenticate administrative and remote access users to a central database.
- Core Knowledge
- Lab Topology
- Initial Configs
- Lab Objectives
- Lab Instruction
Core Knowledge and Real World Scenarios
As companies grow so does the need to authenticate users to a centralized database such as Active Directory. Single sign on (SSO) is a very common policy implemented by companies around the globe to ensure that users do not have multiple usernames and passwords for difference services. Studies show that when a users have to memorize more than three different username and password pairs, they tend to write them down and post them on their monitor which of course is super secure.
As networks grow so does the need to have multiple usernames to administer them with. This of course poses a problem with local usernames on every device in the infrastructure. Imagine hiring a new network engineer and having to go in and add his username and password to over 200 network devices? This is just not feasible.
The simple solution for this problem is to have network devices authenticate administrative access to a RADIUS server or TACACS+ Server (Commonly Cisco ACS). Section 8 of the CCNA Security workbook published by Free CCNA Workbook will go into detail regarding the configuration of Cisco ACS 5 however this lab will just discuss the configuration of the Cisco ASA.
So there are several reasons as to why you would want to use a centralized user database. The first being compliance and regulations. There are several regulations and laws written that users who log into sensitive devices which transmit health, financial or even classified information must be logged for paper trail and auditing purposes.
Another big reason is to minimize administrative overhead. Instead of creating a user account on 200 devices throughout the infrastructure you create it in a single location and if or when the time comes that the engineer you hired has voluntarily left or has been terminated, you can simply disable his account thus revoking his administration and remote access privileges to the network.
RADIUS
First lets take a look at RADIUS which is an IETF Standard and is used around the globe for authentication, authorization and accounting. When using RADIUS for authentication, the username is sent over the wire in clear text however the password is encrypted. While some companies require more security, RADIUS is more than capable of suiting the needs of most companies.
In order to configure the Cisco ASA to authenticate administrative users to a RADIUS server you must first define the radius server group using the aaa-server group STUBLAB_RADIUS protocol radius whereas “STUBLAB_RADIUS” is the name of the group.
After which you must define server host(s) that belong to the newly defined radius server group, this is done through the use of the aaa-server STUBLAB_RADIUS (INSIDE) host 10.1.1.25 CISCO123 whereas (INSIDE) defines the interface in which the radius host is accessible and CISCO123 defines the pass phrase.
Once you define the radius host server you will be placed in aaa-server-host configuration mode where you have the ability to configure additional options related to the specific radius server such as retry-interval, timeout, authentication port and more. For example lets say you want to use the authentication port 1812, in aaa-server-host configuration mode you would use the authentication-port 1812 command.
You can verify your configuration by using the show run aaa-server as demonstrated below;
FW1# show run aaa-server
aaa-server STUBLAB_RADIUS protocol radius
aaa-server STUBLAB_RADIUS (INSIDE) host 10.1.1.25
 key *****
 authentication-port 1812
FW1#
Notice how the pass phrase is anonymized, you can recover the pass phrase by using the more system:running-configuration
When you view the running configuration stored in memory (The system filesystem) you use the pipe commands such as begin, exclude, include, grep.
TACACS+
Next lets take a look at TACACS+ (Pronounced Tack Axe Plus).
Like RADIUS, TACACS+ provides an authentication, authorization and accounting service. This lab will concentrate on the authentication port of TACACS+ whereas all traffic between the authenticating node and the TACACS+ server is encrypted.
However the configuration is very similar in that you define a AAA-Server group by name and protocol, in this case would be TACACS+. The command to do this is aaa-server group STUBLAB_TACACS protocol tacacs+
You also need to define the host servers in the aaa-server group as well as any other optional parameters. In this case the server is defined in the same manner as you would define the RADIUS server using the command aaa-server STUBLAB_TACACS (INSIDE) host 10.1.1.26 CISCO123
Commands You Should Know
As a network engineer implementing the technologies outlined in this lab you should be familiar with the following commands provided in the matrix table below;
| Command | Description |
|---|---|
| aaa-server {GROUP_NAME} protocol {radius | tacacs+} | This command is executed in global configuration mode to define a aaa server group by name and protocol, radius or tacacs |
| aaa-server {GROUP_NAME} (INSIDE) host x.x.x.x PASSPHRASE | This command is executed in global configuration mode to define a host server within the aaa-server group |
| authentication-port 1812 | This command is executed in aaa-server-group configuration mode to define the authentication port for the specific server. Default is 1645, RADIUS Standard used with FreeRADIUS 3.x is 1812. |
Lab Logical Topology
The following logical topology is used in most labs found through out Section 7 of the CCNA Security Workbook;
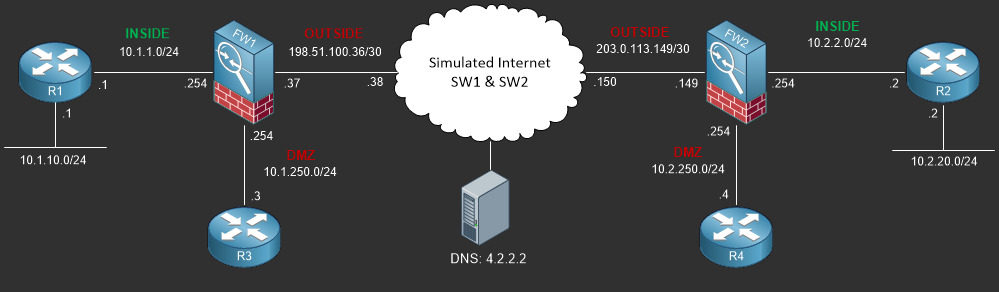
To view the physical cabling topology please visit the Topology page.
RADIUS and TACACS+ Server(s)
To demonstrate the verification process in the Lab Instruction portion of this lab, a RADIUS using TCP Port 1812 and TACACS server has been placed on the INSIDE network segment of FW1 with the host IP address of 10.1.1.25. This server is directly connected to SW1 GigabitEthernet0/2 and configuration to access this server is provided in the initial configuration script of SW1 that you must load before attempting this lab or IP communication with the RADIUS/TACACS+ server will fail.
To verify your configuration with the Stub Lab RADIUS Server and TACACS Server please user the following credentials;
| Username | Password | |
|---|---|---|
| RADIUS | radius.stublab | Stublab123 |
| TACACS+ | tacacs.stublab | Stublab123 |
Lab Device Initial Configurations
In Section 7 you’ll only be configuring FW1. You will however use other lab devices to verify your configuration on FW1.
If you completed the previous lab you can continue where you left off otherwise you’ll need to load the following initial configurations into their respective device(s);
Section 7 Pre-Configured Lab Device(s)
The following lab devices have been pre-configured to save you time as you’ll only be working with FW1 in Section 7.
In order to complete the labs in section 7 you MUST load the following pre-configuration(s);
Before you Start
This lab requires that you have access to a Cisco ASA. You can complete this lab using a virtual Cisco ASA within GNS3 or you can reserve free lab time on the Stub Lab to have access to a pair of Cisco ASA 5510 Series Firewalls which can be used to complete this lab.
Lab Objectives
In this lab you will complete the following objectives.
- On FW1 define the STUBLAB_RADIUS server group using the RADIUS protocol
- On FW1 define the RADIUS Server host 10.1.1.25 using the passkey of CISCO123 and the authentication port of 1812.
- Configure FW1’s SSH AAA authentication list to default to STUBLAB_RADIUS and fail back to local authentication if the radius servers go down.
- Verify the radius configuration using R1 to SSH to FW1’s inside interface 10.1.1.1 using the username of “radius.stublab” and password of “Stublab123”
- On FW1 define the STUBLAB_TACACS server group using the TACACS+ protocol
- On FW1 define the TACACS+ Server host 10.1.1.26 using the passkey of CISCO123
- Modify FW1’s SSHA AAA Authentication list to authenticate login request to STUBLAB_TACACS and fail back to local if STUBLAB_TACACS fails.
- Verify the TACACS configuration using R1 to SSH to FW1’s inside itnerface 10.1.1.1 using the username of “tacacs.stublab” and the password “Stublab123”
One More Thing…
It is recommended that you attempt to complete these lab objectives the first time without looking at the Lab Instruction section.
If you are a student preparing for the Cisco CCNA Security Certification Exam than you are more likely to remember how to complete these objectives if you attempt to complete them the first time on your own with the use of the core knowledge section found in this lab. You should only resort to the Lab Instruction section to verify your work.
Lab Instruction
Objective 1. – On FW1 define the STUBLAB_RADIUS server group using the RADIUS protocol
FW1# config term
FW1(config)# aaa-server STUBLAB_RADIUS protocol radius
FW1(config-aaa-server-group)#
Objective 2. – On FW1 define the RADIUS Server host 10.1.1.25 using the passkey of CISCO123 and the authentication port of 1812.
FW1(config-aaa-server-group)# aaa-server STUBLAB_RADIUS (INSIDE) host 10.1.1.25 CISCO123
FW1(config-aaa-server-host)# authentication-port 1812
FW1(config-aaa-server-host)# exit
FW1(config)#
Objective 3. – Configure FW1’s SSH AAA authentication list to default to STUBLAB_RADIUS and fail back to local authentication if the radius servers go down.
FW1(config)# aaa authentication ssh console STUBLAB_RADIUS LOCAL
FW1(config)# end
FW1#
Objective 4. – Verify the radius configuration using R1 to SSH to FW1’s inside interface 10.1.1.1 using the username of “radius.stublab” and password of “Stublab123”
R1#ssh -l radius.stublab 10.1.1.1
####################################
#  UNAUTHORIZED ACCESS PROHIBITED  #
####################################

Password:
#####################################################
#  CONTACT JOHN PRIOR TO MAKING ANY CONFIG CHANGES  #
#####################################################
Type help or '?' for a list of available commands.
FW1> exit
[Connection to 10.1.1.1 closed by foreign host]
R1#
Objective 5. – On FW1 define the STUBLAB_TACACS server group using the TACACS+ protocol
FW1# config term
FW1(config)# aaa-server STUBLAB_TACACS protocol tacacs+
FW1(config-aaa-server-group)#
Objective 6. – On FW1 define the TACACS+ Server host 10.1.1.26 using the passkey of CISCO123
FW1(config-aaa-server-group)# aaa-server STUBLAB_TACACS (INSIDE) host 10.1.1.26 CISCO123
FW1(config-aaa-server-host)# exit
FW1(config)#
Objective 7. – Modify FW1’s SSHA AAA Authentication list to authenticate login request to STUBLAB_TACACS and fail back to local if STUBLAB_TACACS fails.
FW1(config)# no aaa authentication ssh console STUBLAB_RADIUS LOCAL
FW1(config)# aaa authentication ssh console STUBLAB_TACACS LOCAL
FW1(config)# end
FW1#
Objective 8. – Verify the TACACS configuration using R1 to SSH to FW1’s inside itnerface 10.1.1.1 using the username of “tacacs.stublab” and the password “Stublab123”
R1#ssh -l tacacs.stublab 10.1.1.1
####################################
#  UNAUTHORIZED ACCESS PROHIBITED  #
####################################

Password:
#####################################################
#  CONTACT JOHN PRIOR TO MAKING ANY CONFIG CHANGES  #
#####################################################
Type help or '?' for a list of available commands.
FW1> exit
[Connection to 10.1.1.1 closed by foreign host]
R1#
