Configuring Static NAT (One to One)
Static NAT is commonly used when translating a single public IP address to an internal private address in the DMZ however it can be used for other types of scenarios. In this lab you’ll learn how to configure and verify static NAT on the Cisco ASA running 9.x
- Core Knowledge
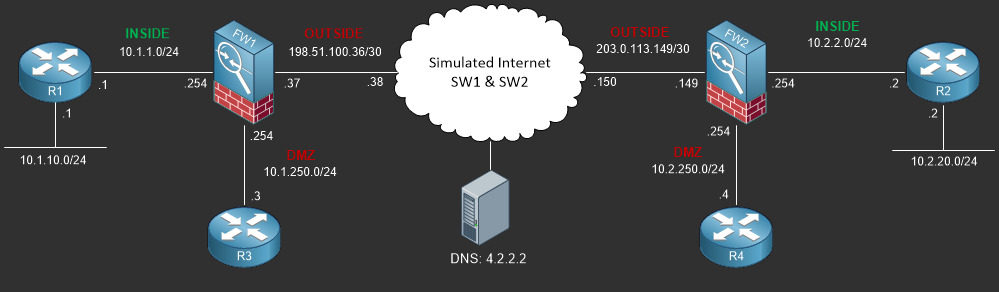
- Lab Topology
- Initial Configs
- Lab Objectives
- Lab Instruction
Core Knowledge and Real World Scenarios
If you completed the previous lab than you have successfully setup a Dynamic NAT which allows multiple inside nodes to be translated to a single IP address on the outside interface thus allowing private inside nodes to access public resources using a public IP address assigned to the OUTSIDE interface.
In this lab you’re going to setup static NAT which in a nutshell is a one to one translation from one interface or IP to another IP on a destination interface. This type of NAT is commonly used in translating public IP addresses allocated to your company on the OUTSIDE interface to private IP addresses in the DMZ or INSIDE interfaces for whatever reason such as web servers, DNS, etc…
There are two ways to configure static NAT, using Auto-NAT or Manual NAT. First lets take a look at the Auto-NAT;
object network WEBSERVER01_STATIC_NAT
 host 10.1.250.11
 nat (DMZ,OUTSIDE) static 198.51.100.11 dns
First you need the object that defines the real host, in this case it is 10.1.250.11 (WEBSERVER01) which is located in the DMZ. Afterwards you define the static NAT translation which translates traffic destined to 198.51.100.11 on the OUTSIDE interface to 10.1.250.11 and forwards the traffic out the DMZ interface towards the destination.
Auto-NAT falls in the second section of NAT execution thus any manual NAT configurations would be preferred.
Next up lets look at the Manual NAT configuration;
object network WEBSERVER01
 host 10.1.250.11
object network WAN_198.51.100.11
 host 198.51.100.11
!
nat (DMZ,OUTSIDE) source static WEBSERVER01 WAN_198.51.100.11
In this example you can see that both the WEBSERVER01 and WAN IP address is defined using an object and the NAT statement is not configured inside the destination object but rather defined in global configuration.
Both Auto-NAT and Manual NAT examples provided perform the same functionality however they are processed in different orders. Manual NAT also allows for you to define a Policy NAT which identifies source to destination traffic and NAT’s it to a specific IP Address which is commonly used in VPN Configuration. Policy NAT will be discussed in a following lab.
After the NAT configuration has been completed you must add the respective entries to the Access Control List(s). Since the NAT change in 8.3 and later, ACL’s are based on the REAL IP addresses and not the MAPPED IPs.
For example, in 8.2 and earlier you would permit traffic on the OUTSIDE interface to 198.51.100.11 however in 8.3 and later, you must permit traffic to the real IP Address 10.1.250.11
So to summarize Static NAT, you need to create an object for the destination node using the real IP address, ie; WEBSERVER01 then define the static nat if using Auto-NAT.
If you’re using Manual NAT you’ll need to define an object for the destination node using the real IP address as well as an object for the mapped address, ie; WAN IP then define the NAT statement.
Commands You Should Know
As a network engineer implementing the technologies outlined in this lab you should be familiar with the following commands provided in the table below;
| Command | Description |
|---|---|
| nat (DMZ,OUTSIDE) static 198.51.100.11 | Static NAT statement defined in the object configuration to build an Auto-NAT policy. |
| nat (DMZ,OUTSIDE) source static WEBSERVER01 WAN_198.51.100.11 | Static NAT statement defined in global configuration referencing the real and mapped IP address via objects to build a Manual NAT policy |
Lab Device Initial Configuration(s)
In Section 7 you’ll only be configuring FW1. You will however use other lab devices to verify your configuration on FW1.
If you completed the previous lab you can continue where you left off otherwise you’ll need to load the following initial configurations into their respective device(s);
Section 7 Pre-Configured Lab Device(s)
The following lab devices have been pre-configured to save you time as you’ll only be working with FW1 in Section 7.
In order to complete the labs in section 7 you MUST load the following pre-configuration(s);
Before you Start
This lab requires that you have access to a Cisco ASA. You can complete this lab using a virtual Cisco ASA within GNS3 or you can reserve free lab time on the Stub Lab to have access to a pair of Cisco ASA 5510 Series Firewalls which can be used to complete this lab.
Lab Objectives
In this lab you will complete the following objectives.
- Build an Auto-NAT by first the WEBSERVER01 object using the host IP of 10.1.250.11
- Define the Auto-NAT Policy by static NAT’ing the outside IP Address 198.51.100.11 to the WEBSERVER01 Object IP in the DMZ
- Verify your configuration by viewing the NAT policies configured on the FW1
- Add an ACE to the OUTSIDE_IN ACL permitting any traffic destined to WEBSERVER01
- Verify your configuration by using TELNET on R2 to telnet to 198.51.100.11 via PORT 80
One More Thing…
It is recommended that you attempt to complete these lab objectives the first time without looking at the Lab Instruction section.
If you are a student preparing for the Cisco CCNA Security Certification Exam than you are more likely to remember how to complete these objectives if you attempt to complete them the first time on your own with the use of the core knowledge section found in this lab. You should only resort to the Lab Instruction section to verify your work.
Lab Instruction
Objective 1. – Build an Auto-NAT by first the WEBSERVER01 object using the host IP of 10.1.250.11
FW1# config terminal
FW1(config)# object network WEBSERVER01
FW1(config-network-object)# host 10.1.250.11
FW1(config-network-object)#
Objective 2. – Define the Auto-NAT Policy by static NAT’ing the outside IP Address 198.51.100.11 to the WEBSERVER01 Object IP in the DMZ
FW1(config-network-object)# nat (DMZ,OUTSIDE) static 198.51.100.11
FW1(config-network-object)# end
FW1#
Objective 3. – Verify your configuration by viewing the NAT policies configured on the FW1
FW1# show nat

Auto NAT Policies (Section 2)
1 (DMZ) to (INSIDE) source static WEBSERVER01 198.51.100.11
    translate_hits = 0, untranslate_hits = 0

Manual NAT Policies (Section 3)
1 (INSIDE) to (OUTSIDE) source dynamic INSIDE_TO_OUTSIDE_DYNAMIC_NAT_NETS interface
    translate_hits = 5, untranslate_hits = 0
FW1#
Objective 4. – Add an ACE to the OUTSIDE_IN ACL permitting any traffic destined to WEBSERVER01
FW1# config terminal
FW1(config)# access-list OUTSIDE_IN permit ip any host 10.1.250.11
FW1(config)# end
FW1# show access-list OUTSIDE_IN
access-list OUTSIDE_IN; 2 elements; name hash: 0xe01d8199
access-list OUTSIDE_IN line 1 extended permit icmp any any (hitcnt=0) 0x835eb415
access-list OUTSIDE_IN line 2 extended permit ip any host 10.1.250.11 (hitcnt=0) 0xe0a5e173
FW1#
Objective 5. – Verify your configuration by using TELNET on R2 to telnet to 198.51.100.11 via PORT 80
R2#telnet 198.51.100.11 80
Trying 198.51.100.11, 80 ... Open
GET
HTTP/1.1 400 Bad Request
Date: Mon, 05 Oct 2015 06:48:07 GMT
Server: cisco-IOS
Accept-Ranges: none

400 Bad Request
[Connection to 198.51.100.11 closed by foreign host]
R2#
