Configuring Cisco ASA Port Address Translation (PAT)
Static PAT is commonly referred to as Port Forwarding from one IP Address to Another IP Address using a SRC/DST Port Pair. In this lab you’ll learn how to configure and verify static PAT on the Cisco ASA running 9.x
- Core Knowledge
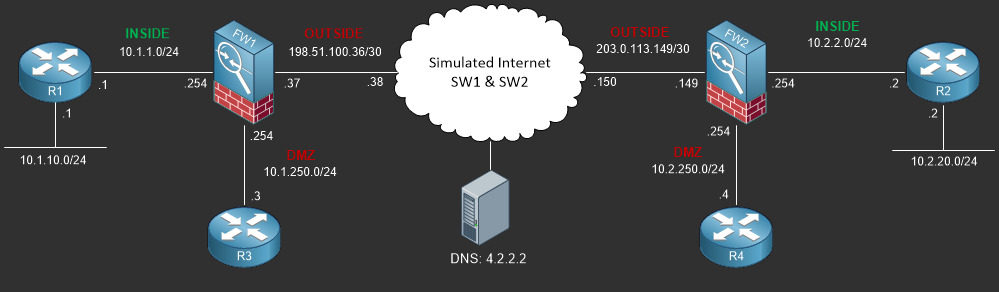
- Lab Topology
- Initial Configs
- Lab Objectives
- Lab Instruction
Core Knowledge and Real World Scenarios
In the previous lab you build a Static NAT (One to One) Translation on the Cisco ASA however in the wild it is more common to encounter Static PAT (Port Address Translation) where you translate traffic destined to a specific IP Address and Dst Port to a different IP Address and Destination Port prior to forwarding the traffic into the network.
Using Static PAT provides a little bit more flexibility where you can use the same IP Address for multiple network resources. For example you have a single public IP Address and you want to host multiple public network services but on separate internal servers internally. Using the single Public IP address you can forward port 80 to the Web Server, Port 21 to a different server which hosts FTP services, port 53 to again yet another internal server for DNS and so on.
When working in a production environment you may encounter Static PAT more often as it provides an additional security barrier as only the destination IP address and destination protocol/port number(s) are translated to internal resources.
In most environments today static PAT is the preferred method of NAT when it comes to public to private resource availability as IPv4 address space is limited and companies need to make use of the resources they have so a single public IP Address can be PAT’ed to multiple DMZ resources.
Like in the previous lab you can build a Static PAT using Auto-NAT or Manual NAT. In this lab we’re going to concentrate on just the Auto-NAT so lets take a look at an example configuration;
object network WEBSERVER02
 host 10.2.250.12
 nat (DMZ,OUTSIDE) static 203.0.113.12 service tcp www 8080
!
access-list OUTSIDE_IN line 3 extended permit tcp any host 10.2.250.12 eq www
So as you can see from the config from above you still need to create an object to define the REAL ip address of the NAT policy followed by the Static PAT policy and the access-list permitting access to the real IP address.
Looking at the Static PAT policy, you can see that we’re translating 203.0.113.12:8080 on the OUTSIDE interface to 10.2.250.12:80 on the DMZ interface.
But what if you only have a single static IP Address? You want to use the IP Address assigned to the OUTSIDE interface? The following example does just that.
object network WEBSERVER03
 host 10.2.250.13
 nat (DMZ,OUTSIDE) static interface service tcp www 8080
!
access-list OUTSIDE_IN line 4 extended permit tcp any host 10.2.250.13 eq www
Having only a single static IP address is common among small branch offices in which case this type of Static NAT/PAT must be used. In this example the OUTSIDE Interface will port forward traffic destined to 203.0.113.149:8080 to 10.2.250.13:80 and of course you cannot forget the ACE entry as the NAT statement alone is not enough to permit traffic to pass through the firewall.
Commands You Should Know
As a network engineer implementing the technologies outlined in this lab you should be familiar with the following commands provided in the table below;
| Command | Description |
|---|---|
| nat (DMZ,OUTSIDE) static 203.0.113.12 service tcp www 8080 | Static PAT Policy defined in the the object configuration mapping the real IP address referenced by the object to the mapped IP Address in the policy statement. |
| nat (DMZ,OUTSIDE) static interface service tcp www 8080 | Static PAT Policy defined in the the object configuration mapping the real IP address referenced by the object to the mapped interface IP Address. |
Lab Device Initial Configuration(s)
In Section 7 you’ll only be configuring FW1. You will however use other lab devices to verify your configuration on FW1.
If you completed the previous lab you can continue where you left off otherwise you’ll need to load the following initial configurations into their respective device(s);
Section 7 Pre-Configured Lab Device(s)
The following lab devices have been pre-configured to save you time as you’ll only be working with FW1 in Section 7.
In order to complete the labs in section 7 you MUST load the following pre-configuration(s);
Before you Start
This lab requires that you have access to a Cisco ASA. You can complete this lab using a virtual Cisco ASA within GNS3 or you can reserve free lab time on the Stub Lab to have access to a pair of Cisco ASA 5510 Series Firewalls which can be used to complete this lab.
Lab Objectives
In this lab you will complete the following objectives.
- Configure an Object for WEBSERVER02 on FW1 using the real IP Address of 10.1.250.12
- Define a Static NAT/PAT Policy for WEBSERVER02 to translate the IP Address 198.51.100.12 Port 8080 to WEBSERVER02 on Port 80
- Verify your Static NAT/PAT Policy for WEBSERVER02 using R2 to telnet to 198.51.100.12 on port 80.
- Define a new Object for WEBSERVER03 on FW1 using the real IP Address of 10.1.250.13
- Configure a Static NAT/PAT Policy for WEBSERVER03 using port 80 of OUTSIDE Interface IP Address
- Verify your Static NAT/PAT Policy for WEBSERVER03 by using R2 to telnet to 198.51.100.37 on port 80
One More Thing…
It is recommended that you attempt to complete these lab objectives the first time without looking at the Lab Instruction section.
If you are a student preparing for the Cisco CCNA Security Certification Exam than you are more likely to remember how to complete these objectives if you attempt to complete them the first time on your own with the use of the core knowledge section found in this lab. You should only resort to the Lab Instruction section to verify your work.
Lab Instruction
Objective 1. – Configure an Object for WEBSERVER02 on FW1 using the real IP Address of 10.1.250.12
FW1# config terminal
FW1(config)# object network WEBSERVER02
FW1(config-network-object)# host 10.1.250.12
FW1(config)#
Objective 2. – Define a Static NAT/PAT Policy for WEBSERVER02 to translate the IP Address 198.51.100.12 Port 8080 to WEBSERVER02 on Port 80
FW1(config-network-object)# nat (DMZ,OUTSIDE) static 198.51.100.12 service tcp www 8080
FW1(config-network-object)# access-list OUTSIDE_IN permit tcp any host 10.1.250.12 eq 80
Objective 3. – Verify your Static NAT/PAT Policy for WEBSERVER02 using R2 to telnet to 198.51.100.12 on port 80.
R2#telnet 198.51.100.12 8080
Trying 198.51.100.12, 8080 ... Open
GET
HTTP/1.1 400 Bad Request
Date: Tue, 06 Oct 2015 07:33:56 GMT
Server: cisco-IOS
Accept-Ranges: none

400 Bad Request
[Connection to 198.51.100.12 closed by foreign host]
R2#
Objective 4. – Define a new Object for WEBSERVER03 on FW1 using the real IP Address of 10.1.250.13
FW1(config)# object network WEBSERVER02
FW1(config-network-object)# host 10.1.250.13
FW1(config-network-object)#
Objective 5. – Configure a Static NAT/PAT Policy for WEBSERVER03 using port 80 of OUTSIDE Interface IP Address
FW1(config-network-object)# nat (DMZ,OUTSIDE) static interface service tcp 80 80
FW1(config-network-object)# access-list OUTSIDE_IN permit tcp any host 10.1.250.12 eq 80
FW1(config)#
Objective 6. – Verify your Static NAT/PAT Policy for WEBSERVER03 by using R2 to telnet to 198.51.100.37 on port 80
R2#telnet 198.51.100.37 80
Trying 198.51.100.37, 80 ... Open
GET
HTTP/1.1 400 Bad Request
Date: Tue, 06 Oct 2015 07:39:33 GMT
Server: cisco-IOS
Accept-Ranges: none

400 Bad Request
[Connection to 198.51.100.37 closed by foreign host]
R2#
